Ghostology 101 · Lesson 14

Basic observation and note-taking

This lesson teaches students how to observe before interpreting: write down what happened, where, when, who was present, what changed, and what ordinary explanations must be checked.

All Lessons Lesson 13 Lesson 15
Ghostology 101 lesson 14 visual

Lesson Reading

Lesson Purpose

This lesson marks the student's transition from learning about investigations to learning how investigators actually work. Observation is the single most important investigative skill. Equipment supports observation. Documentation preserves observation. Without observation there is no investigation. Without documentation there is no evidence. By the end of this lesson, you will understand that careful observation is far more valuable than owning expensive equipment, and that the discipline of documenting what you observe before interpreting it is the foundation of every credible investigation.

Learning Objectives

By the end of this lesson, students should be able to: explain why observation is the foundation of every investigation; distinguish between observation and interpretation in their own notes; describe the key elements that every investigation note should include; use a field journal to document environmental conditions, events, and witness statements; create a chronological log of an investigation session; and separate facts from assumptions, interpretations, and hypotheses in their documentation.

Introduction — The Investigator's Primary Instrument

Investigators spend far more time observing than collecting dramatic evidence. For every hour of active investigation, there are hours of quiet observation — waiting, watching, listening, and documenting. This is not wasted time. This is the core of the investigative process.

Observation is the investigator's primary instrument. Before you pick up an EMF meter, before you set up a camera, before you press record on an audio recorder, you must know how to observe. Your senses — sight, hearing, smell, touch — are the most important tools you will ever own. They are always with you. They never need batteries. They cannot be replaced by any device.

This lesson teaches you how to observe actively and how to document your observations in a way that creates a permanent, reviewable record. You will learn the difference between observation and interpretation, how to take notes that others can understand, and why the discipline of documentation is what separates investigation from storytelling.

What Is Observation?

Observation is the active process of noticing and recording information through your senses. It is not the same as looking. Looking is passive. Observation is active. When you observe, you are deliberately paying attention, noting details, and recording what you perceive.

Seeing. Visual observation is what most people think of when they hear the word "observation." But seeing is not just looking. It is noticing. What is the color of the walls? Where are the windows? What is the furniture arrangement? Are there shadows? Reflections? Sources of light? What is the condition of the floor, ceiling, and walls? A good visual observer notices details that others overlook.

Hearing. Auditory observation is essential in paranormal investigation. What sounds are present? Are they constant or intermittent? Where do they seem to come from? What is their character — a creak, a hum, a tap, a whisper? The ability to identify and describe sounds accurately is a skill that develops with practice. A good auditory observer can distinguish between the sound of a settling house and the sound of footsteps, between wind and a voice, between plumbing and movement.

Smelling. Olfactory observation is often overlooked but can be critically important. Unusual smells can indicate environmental issues: mold, gas, carbon monoxide, dead animals, chemical residues. A musty smell might indicate moisture problems. A sweet smell might indicate a chemical leak. A rotting smell might indicate a dead animal in the walls. Document any unusual odors and their locations.

Feeling. Tactile observation includes temperature, humidity, air movement, and physical sensations. Does the air feel still or moving? Is there a draft near a window or door? Does the temperature change as you move through the room? Are there vibrations in the floor or walls? These physical sensations are data points that should be documented.

Environmental awareness. Observation is not limited to individual senses. It is the integration of all sensory information into a complete picture of the environment. A good observer notices how the room feels overall — not just the temperature, but the quality of the air, the level of ambient sound, the character of the light. This holistic awareness is what allows investigators to notice when something is different from the baseline.

Observation vs. Interpretation

The distinction between observation and interpretation is one of the most important concepts in all of paranormal investigation. Mastering this distinction will transform the quality of your work.

Observation. An observation is a factual description of what you perceived through your senses. It answers the questions: what, when, where, who, and under what conditions. Observations are objective. They can be verified by others. "I heard three knocks from the northeast corner of the room at 9:22 PM" is an observation. "The temperature reading was 62 degrees Fahrenheit near the window" is an observation. "The witness said, 'I saw a figure in the hallway'" is an observation.

Interpretation. An interpretation is a conclusion you draw from your observations. It answers the question: what does this mean? Interpretations are subjective. They are based on your knowledge, experience, beliefs, and assumptions. "A ghost knocked three times" is an interpretation. "The cold spot was caused by a paranormal presence" is an interpretation. "The witness saw a ghost" is an interpretation.

Why the distinction matters. When you mix observations and interpretations in your notes, you lose the ability to go back and re-evaluate the evidence. If you write "a ghost knocked," you have recorded an interpretation, not an observation. Later, when you review your notes, you cannot separate what actually happened from what you thought it meant. But if you write "I heard three knocks from the northeast corner at 9:22 PM," you have preserved the observation. You can interpret it later, and you can change your interpretation as you gather more information.

The discipline of separation. The best investigators develop the discipline of recording only observations in their field notes. Interpretations are saved for the analysis phase. This does not mean you should never interpret. It means you should interpret after you have documented, not before. Write down what you observed. Then, in a separate section or later document, write your interpretations. Keep them separate.

Developing Observation Skills

Observation is a skill. Like any skill, it improves with practice. The following practices will help you become a more effective observer.

Attention. Attention is a limited resource. You cannot notice everything at once. The key is to direct your attention deliberately. Before entering a room, decide what you will focus on. Start with the big picture: the layout, the lighting, the overall feel. Then move to details: specific sounds, temperature variations, small visual details. Train yourself to shift your attention systematically rather than letting it wander.

Patience. Good observation takes time. Do not rush. Sit quietly and let the environment reveal itself. Sounds that are masked by your own movement will become audible when you are still. Details that are hidden in plain sight will emerge when you look carefully. Patience is not passive. It is active waiting — staying alert and ready to notice.

Slowing down. The urge to move quickly through a location is strong, especially when you are excited or anxious. Resist it. Slow down. Walk slowly. Pause frequently. Look at things from different angles. Listen from different positions. The slower you move, the more you will notice.

Looking twice. First impressions can be misleading. Look at everything at least twice. The first look gives you the general impression. The second look reveals details you missed. A shadow that looked like a figure on first glance may be a coat on a hook when you look again. A sound that seemed to come from one direction may have a different source when you investigate.

Using multiple senses. Do not rely on sight alone. Close your eyes and listen. Notice the smells. Feel the air movement. The more senses you engage, the more complete your observation will be. Some of the most important observations in paranormal investigation come from senses other than sight.

Recognizing assumptions. Your brain automatically fills in gaps in sensory information. It makes assumptions about what you are seeing, hearing, and feeling. These assumptions are usually correct, but they can also be wrong. A good observer learns to recognize when they are making an assumption and to check it against additional evidence. "I assume that sound is the furnace" is an assumption that should be verified, not accepted without question.

Taking Good Notes

Good notes are the foundation of credible investigation. Without good notes, your investigation is just a memory. And memories are unreliable. This section teaches you what to include in your notes and how to structure them for maximum usefulness.

Time stamps. Every observation must include the time it was made. Use a consistent format and include the time zone. Synchronize your watch or clock with your team members before the investigation begins. Time stamps allow you to correlate your observations with those of other team members and with equipment readings.

Locations. Be specific about where each observation was made. "The living room" is not specific enough. "The northeast corner of the living room, approximately three feet from the fireplace" is better. Use landmarks, measurements, and floor plans to document locations precisely. If you are outdoors, use GPS coordinates or visible landmarks.

Weather and environmental conditions. Record the weather conditions at the beginning of the investigation and whenever they change significantly. Note the temperature, humidity, barometric pressure, wind conditions, and precipitation. These environmental factors can affect both the location and the people within it.

Lighting. Note the lighting conditions in each area. Are the lights on or off? What type of lighting is present? Are there windows? Are they covered? What is the light level? Lighting conditions affect visual perception and the behavior of cameras and other equipment.

People present. Record who is present and where they are positioned. Note when people move from one area to another. Human activity creates sounds, temperature changes, air movement, and EMF readings. Knowing where team members are at all times helps you avoid interpreting their activity as paranormal phenomena.

Equipment used. Note what equipment is running, where it is placed, and what settings are being used. This information is essential for correlating equipment readings with observations and for evaluating potential false positives.

Environmental conditions. Record the baseline environmental conditions: temperature, humidity, pressure, ambient sound levels, and EMF background. Note any changes to these conditions during the investigation.

Actions taken. Document what you did during the investigation. Where did you go? What did you do? What questions did you ask? What equipment did you use? A chronological log of actions provides context for your observations.

Exact observations. Record exactly what you observed, using sensory language. "I heard a tapping sound" is better than "Something was tapping." "I saw a shadow move across the north wall" is better than "I saw a ghost." Be precise about what you perceived.

Field Journals

A field journal is your primary documentation tool. It is where you record your observations, thoughts, and questions during an investigation. The format you choose matters less than the discipline of using it consistently.

Paper notebooks. Many experienced investigators prefer paper notebooks for field notes. They never run out of batteries. They are not affected by cold, heat, or moisture. They cannot be accidentally deleted. They provide a permanent, unalterable record. A bound notebook with numbered pages is ideal because it prevents pages from being added or removed. Write in pen so entries cannot be erased. If you make a mistake, draw a single line through it so the original entry remains readable.

Digital notes. Tablets, smartphones, and laptops can be used for note-taking. They offer advantages: easy searching, the ability to include photographs and audio recordings, and simple sharing with team members. But they also have disadvantages: batteries can die, screens can be difficult to read in low light, and files can be accidentally deleted or corrupted. If you use digital notes, back them up regularly and carry a paper notebook as a backup.

Voice notes. Audio recordings of your own observations can be useful, especially in low-light conditions or when you need to capture observations quickly. However, voice notes should be transcribed into written form as soon as possible after the investigation. Audio files are harder to search and review than written notes.

Field sketches. A simple sketch can convey information that would take paragraphs to describe. Draw the layout of each room. Mark the positions of furniture, windows, doors, and equipment. Note the locations of observations. Sketches do not need to be artistic. They need to be accurate.

Floor plans. If a floor plan of the location is available, use it as a base for your notes. Mark observation locations, equipment positions, and areas of interest directly on the plan. If no floor plan is available, create a simple one. A rough sketch with measurements is better than no plan at all.

Room diagrams. For detailed observations, create room diagrams that show the specific layout of a room, including furniture, windows, doors, and the positions of people and equipment. Room diagrams help you correlate observations with environmental conditions and equipment readings.

Why handwritten notes still matter. In an age of digital everything, handwritten notes remain valuable. They are immediate — you can write faster than you can open an app. They are reliable — they do not depend on batteries or signal. They are permanent — they cannot be accidentally deleted. And they are personal — your handwriting, your style, your way of recording the world. A well-kept field journal is one of the most valuable tools you will ever own.

Documenting Events

Events during an investigation should be documented in a way that creates a clear, chronological record that can be reviewed and analyzed later.

Chronological logs. Maintain a chronological log of everything that happens during the investigation. Start with the time you arrive and end with the time you leave. Record every significant observation, action, and change in conditions. A chronological log allows you to reconstruct the investigation later and to correlate your observations with those of other team members.

Objective descriptions. Describe events using objective language. "At 9:22 PM, I heard three tapping sounds from the direction of the north wall" is objective. "At 9:22 PM, something tapped on the wall" is less objective because it assumes the source. "At 9:22 PM, a ghost tapped on the wall" is an interpretation, not an observation. Stick to what you actually perceived.

Quotes from witnesses. When interviewing witnesses, record their exact words. Do not paraphrase. Do not summarize. Do not correct their grammar. The exact wording matters because small differences in language can change the meaning of a statement. If a witness says, "I felt a cold spot," write that exactly. Do not write, "She felt a cold breeze." The witness said "cold spot," not "cold breeze." Those are different claims.

Investigator observations. Record your own observations separately from witness statements. Your observations are data. They should be documented with the same care as any other evidence. Note what you observed, when you observed it, where you were, and what conditions were present.

Cross-referencing. When you make an observation, note any other data that might be related. If you hear a sound, note what the audio recorder was doing. If you see a shadow, note what the camera was recording. If you feel a temperature change, note what the thermometer was reading. Cross-referencing your observations with equipment data strengthens the overall record.

Event numbering. Assign a unique number to each significant event. This makes it easier to refer to events in later analysis and to correlate observations across different team members and data sources. Event 1 might be "arrival at location." Event 2 might be "baseline readings taken." Event 3 might be "first unusual sound heard." Numbering creates a clear reference system.

Separating Facts from Opinions

One of the most important skills in investigation documentation is the ability to distinguish between facts, assumptions, interpretations, and hypotheses. Each has a place in your records, but they should be clearly distinguished.

Fact. A fact is an observation that can be verified. "The temperature was 62 degrees Fahrenheit at 9:15 PM" is a fact. "Three knocking sounds were heard from the northeast corner at 9:22 PM" is a fact. Facts are the raw material of investigation. They should be recorded as precisely as possible.

Assumption. An assumption is something you take for granted without verification. "The knocking sound was probably caused by the furnace" is an assumption. Assumptions are not necessarily wrong, but they should be identified as assumptions and tested whenever possible. In your notes, mark assumptions clearly: "Assumption: the sound may be related to the furnace cycling."

Interpretation. An interpretation is a conclusion you draw from facts. "The knocking sound was paranormal" is an interpretation. Interpretations should be clearly separated from observations in your notes. You can record interpretations, but they should be labeled as such and supported by the facts you have documented.

Hypothesis. A hypothesis is a tentative explanation that can be tested. "If the knocking is caused by the furnace, then it should occur when the furnace cycles on" is a hypothesis. Hypotheses are valuable because they lead to further investigation. Record your hypotheses and note whether they are supported or contradicted by subsequent observations.

How to recognize each in your notes. When reviewing your notes, ask: Is this something I actually observed? Or is it something I assumed? Is it a conclusion I drew? Or is it a theory I am testing? Being honest about the difference between facts and interpretations is a sign of a mature investigator. Your notes will be more credible if you clearly distinguish between what you observed and what you think it means.

Field Observation Protocol

A field observation protocol is a repeatable routine that tells you how to observe before the situation becomes exciting. Beginners often wait until something unusual happens before they begin documenting carefully. That is backwards. Careful observation begins before the claim area is entered, before the lights go out, before a session starts, and before the first strange sound is heard. If you only begin taking notes after an event, you have already lost the baseline that would help you understand the event.

Step 1: pause before entering. Before entering a room, hallway, basement, attic, cemetery area, historic building, or reported hotspot, pause for a moment at the threshold. Note who is with you, the time, your purpose for entering, and what equipment is active. This small pause creates awareness. It also prevents the common beginner habit of walking into a space, stirring up dust, changing airflow, making floorboards creak, moving objects, and then trying to interpret the room as if it were untouched.

Step 2: scan the whole environment. Do not stare immediately at the area where activity was reported. First scan the whole room. Where are the windows? Where are the doors? What appliances, vents, pipes, mirrors, screens, electronics, candles, fireplaces, plants, hanging objects, curtains, loose floorboards, pet items, and reflective surfaces are present? What is overhead? What is underfoot? What is behind you? An investigation room is not just a spooky corner. It is a complete physical environment.

Step 3: identify contamination sources. Before any event occurs, list possible sources of contamination. These may include team movement, neighbor activity, outside traffic, HVAC systems, plumbing, animals, insects, cell phones, radios, Wi-Fi routers, old wiring, nearby power panels, weather, tree branches, loose siding, or building expansion and contraction. This is not negative thinking. It is how you protect the record. When something happens later, you already know what ordinary sources need to be checked.

Step 4: establish stillness. Many reported events happen after investigators stop moving. That does not automatically make them paranormal. When people become still, they start hearing sounds that were previously masked by footsteps, clothing, equipment cases, whispering, and chair movement. Establish a period of stillness and document it. Write down when the team became still, who was where, what devices were running, and what sounds were already present. This lets you separate the room's normal soundscape from later changes.

Step 5: observe in layers. Begin with visual observation, then auditory, then airflow and temperature, then smell, then vibration, then emotional and bodily sensations. Do not treat feelings as proof, but do not ignore them either. A note such as "felt pressure in chest" may later connect to mold, air quality, anxiety, fatigue, altitude, dust, or a medical concern. The investigator should document the sensation without assigning a paranormal cause. Layered observation helps students avoid focusing only on what looks interesting.

Step 6: close the observation loop. Before leaving the area, record what changed and what did not change. Did the baseline sounds remain the same? Did lights, temperature, air movement, or equipment behavior change? Did any team member move? Did outside conditions shift? Did the witness add new information? A closed observation loop turns a visit into a complete record rather than a collection of scattered notes.
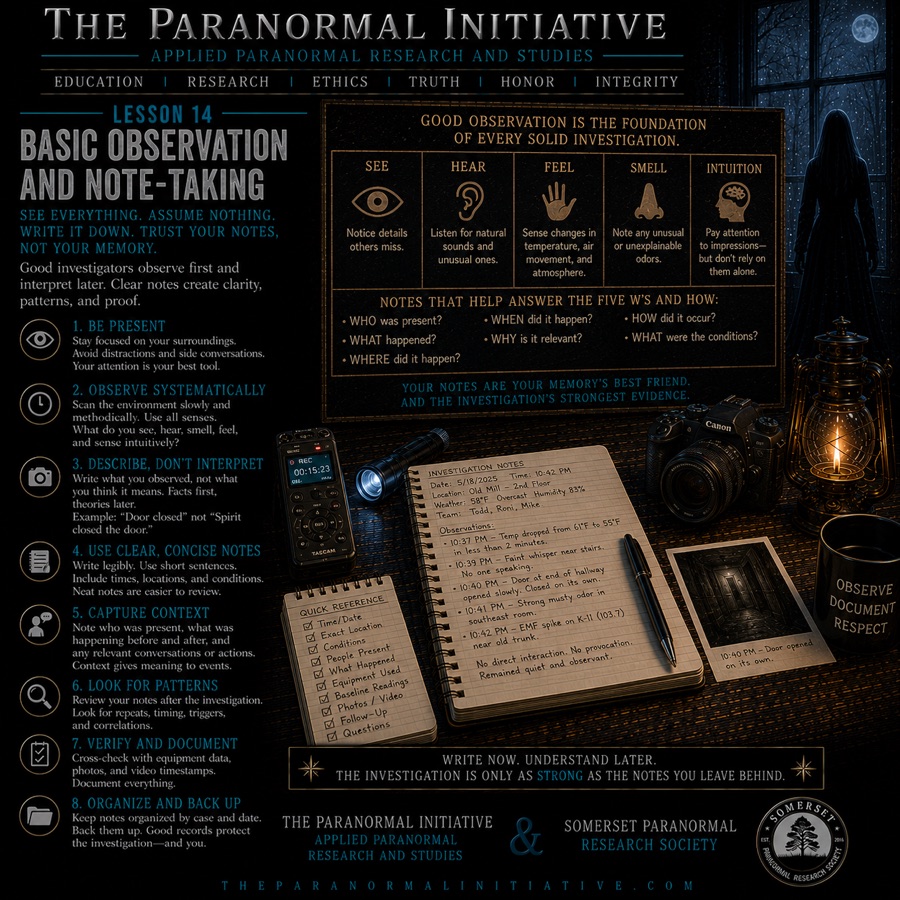
The Five-Line Field Note Format

Students need a simple format they can use under pressure. The five-line field note format is designed for beginners because it forces the investigator to include the minimum information needed for later review. It is not the only way to write notes, but it is a strong starting structure. Every significant event should be documented with five lines: time, location, observation, context, and follow-up.

Line 1: Time. Record the exact time using the team's synchronized clock. Include AM or PM, and when necessary include the date. If the investigation crosses midnight, be especially careful. Many evidence files are later organized by timestamp. A missing or incorrect time can make an observation impossible to match with audio, video, environmental logs, or another investigator's notes.

Line 2: Location. Record where you were and where the observation seemed to occur. These are not always the same. You might be standing in the hallway while hearing a sound from the room to the east. Write both. Use room names, compass directions, landmarks, distances, floor numbers, and floor-plan labels when available. "Bedroom" is vague. "Second-floor front bedroom, west wall near closet" is reviewable.

Line 3: Observation. Record what happened using sensory language. "Heard two short taps" is stronger than "heard something." "Saw a narrow vertical shadow move across lower half of north wall" is stronger than "saw shadow figure." "Smelled brief sulfur-like odor near basement stairs" is stronger than "felt demonic energy." The observation should be plain enough that another investigator can understand what you actually perceived.

Line 4: Context. Record what else was happening at the time. Who was present? Was anyone moving? Was HVAC running? Were questions being asked? Was traffic audible outside? Was a recorder active? Was a phone nearby? Were weather conditions changing? Context is what keeps a note from becoming an isolated story. A strong observation with no context is still weak evidence.

Line 5: Follow-up. Record what should be checked next. This might be "review camera 2 at 10:42 PM," "check furnace cycle," "inspect north wall for pipes," "compare with audio recorder A1," "ask witness whether sound matches claim," or "attempt controlled reproduction." Follow-up notes turn observation into investigation. Without follow-up, the note may never become useful.

A complete five-line note might read: "10:42 PM. Second-floor hallway, observer standing near stair landing, sound seemed to come from east wall. Heard three knocks, evenly spaced, moderate volume. Present: Todd, Sarah, Mike; no one speaking; HVAC running; recorder A2 active; exterior wind light. Follow-up: check pipes/east wall, compare A2 timestamp, ask team to recreate footstep and wall-tap sounds." This note does not prove anything. That is exactly why it is useful. It preserves the event so the team can study it honestly.

Real-Time Event Tagging

Real-time event tagging is the practice of marking an event as it happens so it can be found later in audio, video, environmental data, and written logs. Tags are especially important in long investigations because evidence review can involve hours of recordings. Without tags, reviewers may waste time searching blindly or may miss important moments entirely. A tag is not a conclusion. It is a bookmark.

Verbal tags. When audio or video is recording, investigators can speak a short tag aloud: "Tag, 10:42 PM, three knocks heard near east wall." The statement should be calm, brief, and factual. Avoid emotional comments such as "That was amazing" or "It answered us." A verbal tag helps reviewers locate the moment and understand the context. It also documents whether investigators were speaking, moving, or reacting at the time.

Written tags. The same event should be written in the field journal. A verbal tag is helpful, but it is not enough. Audio can be corrupted. Video can fail. A written tag gives the team a second record. The written tag should match the verbal tag as closely as possible, with extra context added after the moment passes.

Digital tags. Some teams use case-management tools, logging apps, spreadsheets, or event-marker buttons to tag moments. Digital tagging can be powerful because it creates sortable timelines. However, it still requires discipline. A button press labeled "Event" is not enough if no one records what the event was. Digital tags should include description, location, people present, equipment status, and follow-up action.

Known-contamination tags. Tagging is not only for strange events. It is equally important to tag known contamination. If an investigator coughs, drops a flashlight, bumps a table, whispers, walks through a room, or adjusts a camera, tag it. If a vehicle passes, a dog barks, a furnace turns on, thunder rolls, or a door is opened by a team member, tag it. Known-contamination tags prevent ordinary events from being mistaken for paranormal evidence during review.

Session tags. Start and end every session with clear tags. "Beginning baseline sweep, 8:12 PM, first floor." "Ending hallway vigil, 10:58 PM, no unexplained events observed." These tags make the evidence timeline easier to build. They also show that quiet periods were documented, not ignored.

Good tagging protects the investigation from two common problems: forgetting and storytelling. Forgetting happens because humans cannot remember every detail after hours of work. Storytelling happens when a dramatic moment is retold later with extra certainty. A tag preserves the event close to the time it happened, before memory reshapes it.

From Field Notes to Case File

Field notes are the raw record. The case file is the organized record. Both matter. A field notebook captures events as they happen. A case file makes those events reviewable for the team, the client, future investigators, and the curriculum. Students should learn early that the investigation is not finished when the team leaves the location. The documentation phase continues until the notes have been reviewed, clarified, organized, and connected to evidence files.

Transcribe soon. Field notes should be transcribed as soon as practical after the investigation, preferably within 24 to 48 hours. The goal is not to rewrite history. The goal is to preserve legibility, add structure, and clarify abbreviations while memory can still help explain your own shorthand. Original notes should remain unchanged. The transcription should be marked as a transcription and should preserve the original meaning.

Separate original notes from cleaned notes. The original notebook, voice memo, or raw digital log should be stored as original documentation. A cleaned version can be created for the case file. The cleaned version may correct spelling, expand abbreviations, add headings, and arrange events into a timeline, but it should not quietly change what was recorded. If new information is added later, label it as an addendum.

Build the timeline. After transcription, combine notes from all investigators into one evidence timeline. Include arrival, walkthrough, baseline readings, equipment placement, witness interviews, quiet sessions, event tags, known contamination, environmental changes, breaks, and departure. A timeline lets the team see whether events cluster around certain rooms, times, equipment, weather shifts, or human movement.

Attach evidence references. When a note mentions audio, video, photos, EMF readings, or environmental logs, attach the file name or evidence ID. "Review audio" is vague. "Review A2_Hallway_2242.wav from 10:41:30-10:43:00" is reviewable. The goal is for another person to open the case file and follow the trail from note to evidence without needing the original investigator to explain everything verbally.

Preserve uncertainty. Case files should not convert uncertain notes into confident claims. If the field note says "sound may be from east wall," the case file should not say "sound came from east wall." If the witness said "it looked like a figure," the case file should not say "witness saw apparition." Case-file writing should improve clarity without increasing certainty beyond what the record supports.

Use professional language. A case file should be clear, calm, and respectful. Avoid dramatic wording. Avoid jokes that could embarrass a client. Avoid language that makes team excitement sound like evidence. A professional case file may be read months or years later by someone who was not present. It should explain what happened, what was checked, what remains unknown, and what conclusions are justified.

The final standard is simple: if another investigator can reconstruct what happened, where it happened, when it happened, who was present, what conditions existed, what evidence files connect to it, what ordinary explanations were checked, and what remains unknown, the documentation is doing its job. If they cannot, the case file is incomplete no matter how interesting the story sounds.

Observing Under Pressure

Observation becomes harder when the situation feels intense. A beginner may be calm during a classroom exercise and then lose discipline when a loud knock happens in a dark hallway, a witness becomes emotional, a device starts flashing, or a teammate whispers, "Did you see that?" The body reacts before the notebook does. Heart rate rises. Attention narrows. People speak over each other. Details disappear. This is normal human behavior, but investigators have to train for it.

Name the pressure. When something startling happens, silently recognize the pressure: "I am excited," "I am startled," "I want this to be meaningful," or "The client is afraid." Naming the pressure does not weaken the investigation. It protects it. A student who can recognize their own emotional state is less likely to mistake excitement for evidence.

Return to the five questions. Under pressure, return to the simplest structure: what happened, when did it happen, where did it happen, who was present, and what conditions existed? These five questions are the anchor. If students remember nothing else during a startling event, they should remember those questions. They turn a dramatic moment back into a documented event.

Use calm team language. Team members should avoid shouting conclusions during an event. "It answered us," "That was a ghost," "It is in here," or "This room is active" can contaminate witness perception and teammate memory. Better language is calm and descriptive: "Tag, 10:42 PM, three knocks heard," or "I saw movement near the north wall; checking light sources." Calm language keeps the team oriented.

Assign roles when possible. In a team investigation, one person should not try to observe, operate equipment, reassure the client, ask questions, and write everything down at once. Divide roles. One person leads the session, one person logs, one person watches equipment, and one person monitors environment and team movement. Roles can rotate, but they should be clear. Confusion creates contamination.

Do not let the group decide too quickly. Groups can accidentally pressure each other into agreement. One person says, "That sounded like a voice," and suddenly everyone hears a voice. One person says, "That was a child," and the interpretation spreads. Good teams protect independent observation. Ask each person to write what they perceived before group discussion. Later, compare the notes. Agreement is more meaningful when it was not created by suggestion.

Document disagreement. If team members perceive an event differently, record the disagreement. One investigator may hear two knocks while another hears three. One may see a shadow while another sees a reflection. This does not mean someone is unreliable. It means perception varies. Documenting disagreement gives the case file honesty and helps later reviewers understand the limits of the observation.

Protect the witness. When a client or witness is present during an event, the team has an extra responsibility. Do not amplify fear. Do not announce paranormal conclusions in front of a frightened client. Do not ask leading questions such as "Did you feel that evil energy?" Instead, ask neutral questions: "What did you notice?" "Where were you looking?" "Did you hear the same sound?" The goal is to preserve the witness's independent report.

Students should practice observation under pressure before they need it. In class, the instructor can create a controlled exercise: play a brief sound, flash a light, move an object, or show a short video clip, then ask students to write notes without discussing it. The exercise teaches a humbling lesson: even simple events are remembered differently. That is why documentation matters.

Practical Investigation Examples

The following scenarios illustrate the difference between poor documentation and excellent documentation. Each example shows how the quality of notes affects the usefulness of an investigation.

Example 1: The Basement Sound. Two investigators investigate a report of strange sounds in a basement. Investigator A writes: "Went to basement. Heard weird noises. Probably haunted." Investigator B writes: "Entered basement at 9:15 PM. Temperature 62°F, humidity 55%. Heard a single knocking sound from the northeast corner at 9:22 PM. Checked plumbing in that area. No pipes in that wall. Noted for further review. Heard a second knocking sound at 9:28 PM from the same area. Checked HVAC. Furnace cycled on at 9:27 PM. Sound may be related to duct expansion." Six months later, only Investigator B's notes are useful. Investigator A's notes are just an opinion.

Example 2: The Shadow. Investigator A writes: "Saw a shadow figure in the hallway. Definitely a ghost." Investigator B writes: "At 10:05 PM, while standing at the east end of the hallway, I observed a dark shape move across the north wall from left to right. The shape was visible for approximately two seconds. I checked for potential sources: a car passed outside the window at 10:05 PM, and the headlights could have created the shadow. I also noted that a team member was walking in the adjacent room at the same time. The shadow may have been caused by either of these sources." Investigator B's notes allow for later analysis. Investigator A's notes are a conclusion without supporting data.

Example 3: The Cold Spot. Investigator A writes: "Felt a cold spot in the bedroom. Spirit presence." Investigator B writes: "At 10:30 PM, while standing near the north window of the master bedroom, I felt a noticeable temperature drop on my left side. I checked the thermometer: 58°F near the window versus 65°F in the center of the room. I checked for drafts: the window is old and has a visible gap in the seal. The temperature difference is consistent with a draft from the window. I will recommend weatherstripping." Investigator B's notes identify a likely natural cause. Investigator A's notes jump to a paranormal conclusion.

Example 4: The Witness Interview. Investigator A writes: "Witness said she saw a ghost in the kitchen." Investigator B writes: "Interviewed witness at 8:00 PM in the living room. Witness stated: 'I was standing at the kitchen sink at about 11 PM last Tuesday when I saw a figure in the reflection of the window. It was a tall shape, dark, and it was gone when I turned around.' Witness appeared calm but curious. She said she had not had any similar experiences before. She mentioned that the kitchen window overlooks the street and that car headlights sometimes create reflections." Investigator B's notes preserve the witness's exact words and provide context. Investigator A's notes lose the specific details.

Example 5: The Environmental Log. Investigator A writes: "Nothing happened. Boring night." Investigator B writes: "Arrived at 8:00 PM. Weather: clear, 72°F, humidity 40%, barometric pressure 30.10 inHg and rising. Baseline readings taken in all rooms. Temperature range: 68-72°F. EMF background: 0.5-1.5 mG. No significant anomalies detected during the investigation period (8:00 PM - 11:00 PM). Documented normal settling sounds, HVAC cycling, and one instance of a car passing outside. Investigation concluded at 11:00 PM. No unexplained phenomena documented." Investigator B's notes are valuable because they establish that no anomalous activity was observed under documented conditions. Investigator A's notes are worthless.

Example 6: The Team Coordination. Two team members investigate the same location but do not coordinate their note-taking. Investigator A records observations in a personal notebook with no time synchronization. Investigator B does the same. After the investigation, they try to compare notes but cannot match their observations because their times are different and they used different location descriptions. A third team member, Investigator C, used a synchronized watch and a standardized note format with event numbers. Investigator C's notes can be correlated with both A and B's notes, revealing that what A thought was a paranormal sound was actually B walking in the next room. Good documentation and coordination prevented a false conclusion.

Common Beginner Mistakes

Observation and note-taking are skills that develop with practice. The following mistakes are common among beginners. Recognizing them will help you avoid them.

Forgetting times. The most common mistake is failing to record the time of observations. Without a time stamp, an observation cannot be correlated with other data. It cannot be placed in sequence. It loses much of its value. Make time stamps a habit. Record the time of every observation, every reading, and every significant event.

Writing conclusions instead of observations. Beginners often write what they think happened rather than what they actually observed. "A ghost was present" is a conclusion. "I felt a temperature drop of 5 degrees" is an observation. Train yourself to record only what you perceive through your senses. Save conclusions for later analysis.

Poor handwriting. Notes that cannot be read are useless. If your handwriting is difficult to read, slow down and write more carefully. Consider printing instead of using cursive. If you are taking notes in the dark, use a voice recorder and transcribe later. The goal is to create a record that you and others can read.

Missing environmental conditions. Beginners often focus on dramatic events and forget to document the mundane environmental conditions. But environmental data is often the most important information you can collect. Without it, you cannot distinguish between normal and anomalous conditions. Document temperature, humidity, lighting, sound levels, and weather at the beginning of every investigation.

Failing to identify witnesses. When recording witness statements, include the witness's name, contact information, and relationship to the location. Note the context of the interview: who was present, where it took place, and what time. This information is essential for evaluating the reliability of the testimony.

Changing notes afterward. Never alter your original notes after the investigation. If you need to add information or clarify something, do so in a separate document or in a clearly marked addition. Original notes are the primary record. Altered notes are suspect. If you make a mistake, draw a single line through it so the original entry remains readable.

Writing only what seems important. Beginners often record only the moments that seem interesting and skip the uneventful periods. But the absence of activity is also data. A complete record of an investigation includes the quiet hours as well as the exciting moments. You cannot know what is significant until you have the full picture.

Common Misconceptions

The following misconceptions are particularly common when it comes to observation and note-taking. Understanding them will help you avoid the most frequent pitfalls.

"I will remember the important details later." You will not. Memory is highly unreliable, especially after an emotionally intense or lengthy investigation. Details fade. Details change. Details are replaced by plausible but incorrect information. Write it down when it happens. Do not trust your memory.

"My recorder captured everything, so I do not need notes." Audio and video recordings are valuable, but they are not a substitute for notes. Recordings capture sound and images, but they do not capture your thoughts, your sensory impressions, or the context of your observations. Notes and recordings complement each other. Use both.

"Notes are not important. The evidence speaks for itself." Evidence does not speak for itself. It must be interpreted. Notes provide the context that makes interpretation possible. Without notes, a recording is just a sound. A photograph is just an image. Notes turn data into evidence.

"I only need to write down unusual things." You need to write down everything. The absence of activity is data. Normal conditions are the baseline against which anomalies are measured. If you only record unusual events, you have no context for evaluating them. Document the ordinary as well as the extraordinary.

"Good notes have to be neat and well-organized." Good notes need to be honest and timely. Neatness can come later when you transcribe your field notes into a case file. The important thing is to capture the observation in the moment. You can organize later.

"If I write down my interpretations, I am being honest about what I think." Interpretations have their place, but they should be clearly separated from observations. If you mix them, you lose the ability to re-evaluate the evidence later. Record observations in one section and interpretations in another. Keep them separate.

Student Activity — 15-Minute Observation Exercise

For this activity, you will practice observation and note-taking in an ordinary room. The goal is to document everything you observe without interpreting anything.

Choose a room in your home or any location you can access. Set a timer for 15 minutes. During that time, observe and document the following. Use these observations for optional reflection or discussion.

Environment: Describe the room. What is the size, shape, and layout? What furniture is present? What are the colors and materials? What is the condition of the room?

Sounds: Sit quietly and listen. Write down every sound you hear. Note whether each sound is constant or intermittent. Note the direction it seems to come from. Note what might be causing it.

Lighting: Describe the lighting conditions. What type of lighting is present? Are there windows? What is outside them? Are there shadows or reflections? How does the light change over time?

Temperature: Note the temperature in different areas of the room. Is it uniform, or are there variations? What might cause any differences?

Activity: Note any movement you observe. Curtains moving, dust particles in the air, shadows shifting, people or pets moving. What is causing each movement?

Timeline: Create a chronological log of your observations. Record the time of each observation. Note how conditions change over the 15-minute period.

Objective observations only: Do not interpret anything. Do not write "the room felt creepy" or "that sound was probably the furnace." Write only what you actually observed through your senses. "I heard a clicking sound from the direction of the window at 2:05 PM" is an observation. "The furnace made a clicking sound" is an interpretation. Stick to observations.

After completing the exercise, review your notes. Did you capture enough detail for someone else to understand the room? Did you include time stamps? Did you separate observations from interpretations? What would you do differently next time?

Reflection Questions

The following questions are designed to help you think more deeply about the concepts in this lesson. Use these as optional reflection or discussion prompts.

1. Why is it important to separate observation from interpretation in your notes? What problems can arise when you mix the two? Think of a specific example from your own experience or from the examples in this lesson.

2. Imagine you are reviewing another investigator's notes from a case. What would you look for to determine whether the notes are reliable? What would make you trust or question the documentation?

3. You are investigating a location and hear a sound that could be either a paranormal phenomenon or a normal building sound. How do you document it? What information would you include in your notes to preserve both possibilities?

4. Why is it important to document environmental conditions even when nothing unusual is happening? What value does a record of "nothing happening" have?

5. A witness tells you, "I saw a ghost in the hallway last night." How do you document this statement? What additional information would you need to record to make the documentation useful?

6. You are investigating with a team, and you realize that your watches are not synchronized. How does this affect your documentation? What would you do to fix the problem?

7. After an investigation, you realize that your notes are incomplete. You remember several important details that you did not write down. Should you add them to your notes? Why or why not? How would you handle this situation?

8. How does the discipline of careful observation and note-taking change the way you think about paranormal investigation? Does it make the work more challenging, more rewarding, or both?

Key Takeaways

This lesson has covered the essential principles of observation and note-taking in paranormal investigation. The key takeaways are:

Observation is the foundation of every investigation. Without observation, there is no investigation. Without documentation, there is no evidence.

Observation is an active skill, not a passive activity. It requires attention, patience, and the deliberate use of all your senses. It improves with practice.

The distinction between observation and interpretation is one of the most important concepts in paranormal investigation. Observations are factual descriptions of what you perceived. Interpretations are conclusions you draw from those observations. Keep them separate in your notes.

Good notes answer five questions: What did you observe? When did you observe it? Where were you? Who else was present? What were the conditions? If your notes answer these questions, they are useful. If they do not, they are incomplete.

Use a dedicated field journal. Paper notebooks are reliable and permanent. Digital tools are convenient but have limitations. Use what works for you, but use it consistently.

Document events chronologically. Use time stamps, event numbers, and cross-references to create a clear record that can be correlated with other data.

Separate facts from assumptions, interpretations, and hypotheses in your notes. Label each clearly. This discipline protects the integrity of your documentation.

Never alter original notes. If you make a mistake, draw a single line through it. If you need to add information later, do so in a separate document or clearly marked addition.

Document everything, not just the unusual moments. The absence of activity is data. Normal conditions are the baseline against which anomalies are measured.

The most valuable investigative tool is not an EMF meter, a recorder, or a camera. It is a disciplined observer who carefully documents reality before attempting to explain it.

Repository Connections

The concepts in this lesson connect to several resources within The Paranormal Initiative - Applied Paranormal Research and Studies. Use these links to deepen your understanding of observation and documentation.

Investigation Compendium: For comprehensive standards on investigation documentation, case file structure, and evidence management, see the Investigation Compendium.

Evidence Compendium: For guidance on how observations become evidence and how to document evidence properly, see the Evidence Compendium.

Terminology Reference: For definitions of terms used in this lesson, including observation, interpretation, fact, assumption, and hypothesis, see the Terminology Reference.

Field Forms: For templates of investigation logs, witness interview forms, and evidence documentation sheets, see the Legal and Client Forms.

Equipment Manual: For guidance on how to document equipment readings and integrate them with your observation notes, see the Equipment Manual.

Where You Will Learn More

This section continues the recurring feature in Ghostology 101 that connects each lesson to the broader curriculum. The observation and documentation skills introduced here will be developed further in several advanced tracks.

Field Operations. The Field Operations track teaches the practical skills of conducting a site visit, including pre-investigation planning, site arrival and walkthrough, baseline sweeps, room-by-room documentation, and post-investigation wrap-up. These skills build directly on the observation and note-taking foundations established in this lesson.

Evidence and Analysis. The Evidence and Analysis track teaches how to evaluate observations as evidence, how to weight different types of testimony, and how to build a complete case file from your field notes. You will learn how to turn your observations into a coherent investigation report.

Research Methods. The Research Methods track teaches how to integrate historical research with field observations. You will learn how to compare what you observe in the field with what the historical record tells you about a location.

Applied Paranormal Research and Studies. The professional curriculum includes advanced instruction on case file development, professional reporting standards, and evidence presentation. These courses assume the foundational documentation skills you are building now and extend them into professional practice.

Each of these tracks will deepen your ability to observe, document, and analyze. The foundation you are building now will support everything you learn in the future.

Next Lesson Connection

You have now learned how to observe and document your observations. These skills are the foundation of every investigation. The next lesson, Lesson 15, will teach you about field safety and permission. You will learn how to keep yourself and others safe during an investigation, how to assess potential hazards, and why written permission is non-negotiable.

After learning about people, history, environment, psychology, belief, equipment, and observation, you are now ready to learn how to conduct yourself safely and professionally in the field. Lesson 15 begins that journey.

Field Application

In the field, basic observation and note-taking becomes visible through small decisions. The investigator decides what questions to ask, what details to write down, what assumptions to avoid, and what language to use when speaking with others. A student who understands this lesson should be able to enter a location and behave differently because of it. The learning should change conduct, not simply add information. A team hears three knocks from a hallway. A weak note says, 'Ghost knocked.' A professional note says, '10:42 PM, second-floor hallway, three knocking sounds heard from area near east wall. Present: Todd, Sarah, Mike. HVAC running. Audio recorder A2 active in hallway. No one speaking at moment. Follow-up: check pipes, exterior wall, wind, team movement, and recorder timestamp.' The point of the example is not to give the student a script to memorize. It is to show how the concept works under real pressure. Fieldwork is rarely neat. People interrupt each other. Equipment fails. Weather changes. A witness remembers something after the interview is over. A teammate gets excited. A client asks for certainty. A responsible investigator uses the foundation from this lesson to stay oriented when the situation becomes messy. When teaching this section live, ask students to describe what they would do first, second, and third. If they jump straight to a paranormal explanation, bring them back to the process. What exactly was reported? Who reported it? When did it happen? What changed in the environment? What was documented? What can be checked? That sequence is the difference between curiosity and investigation.

Documentation Standard

Documentation is the way this lesson becomes reviewable. The student should not merely say that they understand the concept. They should be able to record it in a case file. Notes should include the claim, the setting, the people present, the relevant environmental conditions, the questions asked, the actions taken, and the limits of what was learned. If a later reviewer cannot reconstruct the reasoning, the documentation is incomplete. Practice writing five notes from short prompts. Each note must include time, location, observation, people present, conditions, and next step. Then underline any words that are interpretations rather than observations. This optional practice can be discussed, demonstrated, or written privately. The student should focus on clear separation between observation and interpretation. The goal is to build the habit of writing like an investigator rather than narrating like a storyteller. A good entry should allow someone who was not present to understand what happened and how the student thought through it. The documentation should also include what was not known. Beginners often omit uncertainty because they think it makes them look unprepared. In reality, uncertainty is one of the most professional things an investigator can preserve. Write down what remains unknown, what still needs to be checked, and what would be required before a stronger conclusion could be reached.

Common Failure Points

The common failure is believing memory will be enough. It will not. A student may feel certain in the moment and forget key details ten minutes later. Good notes are not a sign of distrust in memory; they are a sign of respect for the case. This mistake is common because the paranormal field rewards certainty, confidence, and dramatic language. Social media rewards the strongest claim, not the most careful one. A classroom, however, must reward process. The student should learn to recognize when excitement is pushing them ahead of the evidence. Another common failure is treating the lesson as theory only. A student may agree with the principle in class but abandon it during a case because the situation feels unusual. The entire purpose of Ghostology 101 is to make the principle strong enough to survive the field. The lesson should therefore include examples, examples and optional practice prompts that invite the student to apply the idea rather than simply admire it. The instructor should also watch for language that hides assumptions. Words such as "definitely," "obviously," "evil," "spirit," "energy," "proof," and "debunked" can all be useful in some contexts, but they can also smuggle conclusions into the record. Students should be trained to replace conclusion-heavy language with descriptive language whenever the evidence is still being evaluated.

Lesson 13 Back to Ghostology 101 Lesson 15