Ghostology 101 · Lesson 16

Intro to audio, photo, and video review

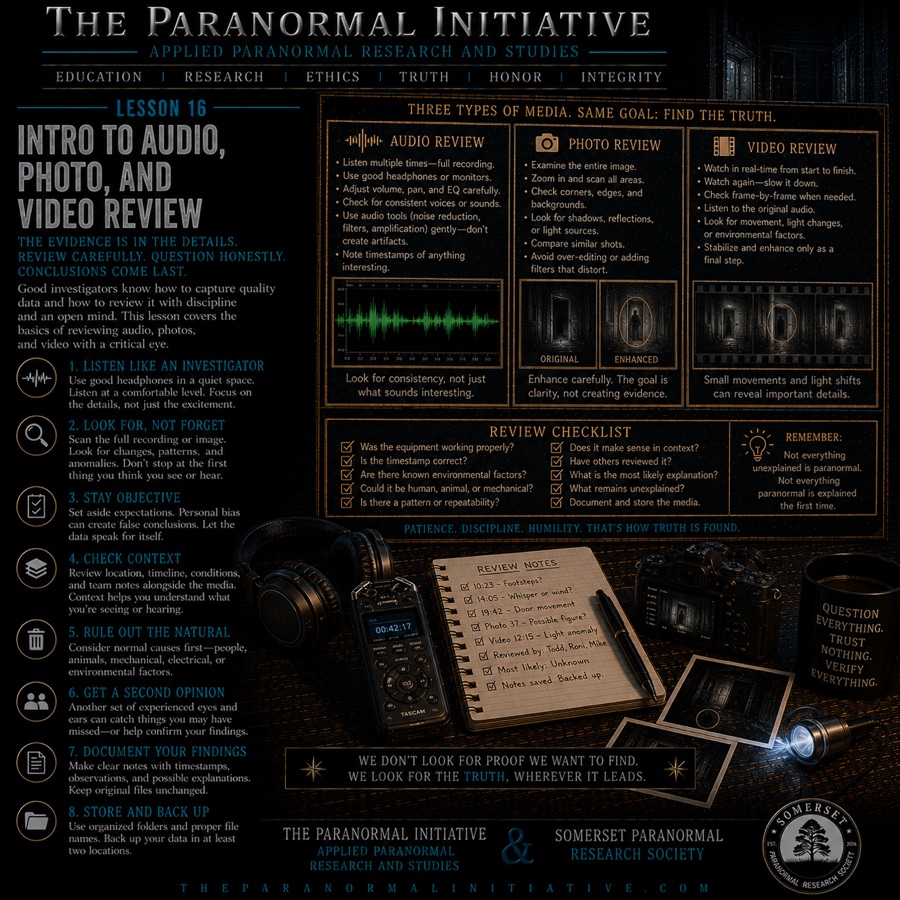
This lesson introduces beginner review standards for recordings, images, and video. Students learn to avoid jumping to conclusions from noise, compression, blur, reflections, and expectation.

All Lessons Lesson 15 Lesson 17
Ghostology 101 lesson 16 visual

Lesson Reading

Lesson Purpose

This lesson introduces students to the disciplined review of investigation media. Collecting audio recordings, photographs, and video footage is only the beginning of the evidence process. The real work begins during careful review, comparison, documentation, and analysis. This lesson is not an advanced evidence analysis course. It teaches beginners how to begin reviewing collected media in an organized, objective, and repeatable manner. By the end of this lesson, students should understand that careful, organized review — not excitement — is what transforms recordings and photographs into useful investigative data.

Learning Objectives

By the end of this lesson, students should be able to: explain why evidence review is often more important than evidence collection; describe how to organize media files for systematic review; preserve original files and work only with copies during analysis; apply objective analysis techniques to audio, photo, and video evidence; identify ordinary explanations for common anomalies; document observations clearly without premature conclusions; and recognize how expectation and bias can affect what they perceive during review.

Introduction — The Real Work Begins After the Investigation

An investigation may generate hundreds or even thousands of media files. A single night of recording can produce hours of audio, dozens of photographs, and multiple video clips. When the team packs up and leaves the location, the evidence review has not yet begun. The collection phase is over. The analysis phase is just starting.

This is a critical distinction that many new investigators miss. They treat the investigation itself as the main event and the review as an afterthought. In professional practice, the opposite is true. The investigation is the data-gathering phase. The review is where that data becomes meaningful — or not.

Review requires patience, organization, and a willingness to be wrong. It requires listening to hours of uneventful audio, examining dozens of ordinary photographs, and watching video footage that shows nothing unusual. It requires the discipline to document what is actually there rather than what you hope to find. This lesson teaches you how to approach that work systematically.

Evidence Compendium Standards for Beginners

The Evidence Compendium and the Forensic Analysis Compendium become especially important in this lesson because they turn media review into a repeatable discipline. Ghostology 101 students do not need to perform advanced forensic analysis yet, but they do need to understand the habits that make later analysis possible. A recording that is renamed randomly, edited destructively, shared online before review, or separated from its notes loses value. A photograph without capture context loses value. A video clip without the minutes before and after the claimed event loses value. The compendiums exist to prevent that loss.

Evidence is not the same thing as an interesting file. An interesting file may be a strange sound, an odd shadow, a moving light, a blurred shape, or a voice-like pattern. Evidence is a file that has been preserved, described, compared, contextualized, and reviewed through a documented process. The difference matters. A dramatic clip without documentation may be exciting, but it is weak evidence. A quiet recording with accurate timestamps, location notes, environmental context, reviewer notes, and preserved originals may be much more useful.

Beginner review should classify, not prove. At this stage, students should learn to sort media into practical categories: explained, likely explained, unresolved, unusable, and needs further review. Explained means the likely source has been identified. Likely explained means the ordinary explanation is strong but not fully confirmed. Unresolved means the team has not identified a cause after reasonable review. Unusable means the file cannot support a claim because it is too contaminated, incomplete, distorted, compressed, cropped, edited, or detached from context. Needs further review means the file should be escalated to a more detailed analysis process later.

Unresolved does not mean paranormal. This is one of the most important standards in the Evidence Compendium mindset. A beginner may hear "unresolved" and feel that the case is moving toward proof. It is not. Unresolved only means that the team has not identified a cause with the available information. The cause may still be ordinary. It may be a missed team member, an animal, a vehicle, a device artifact, a camera setting, a reflection, a draft, a compression error, or a source that cannot be reconstructed. Honest review protects that uncertainty instead of turning it into a claim.

The Forensic Analysis Compendium teaches limits. Forensic-style review is not magic. Enhancement cannot create truth. Zooming cannot create detail that the camera did not capture. Noise reduction can remove information and create artifacts. Audio filtering can make random sounds seem more speech-like. Frame interpolation can invent motion between frames. Stabilization can change how movement appears. Color correction can change the emotional impression of a scene. Beginners should learn this early: processing is a tool for inspection, not a tool for manufacturing certainty.

The goal of this lesson is to prepare students to use the compendiums responsibly later. When you review media, your job is not to win an argument, prove a belief, or produce a dramatic reveal. Your job is to protect the record, describe the observation, test ordinary explanations, document what was done, and leave the conclusion proportional to the evidence.

Reviewing Audio — Listening with Purpose

Audio review is one of the most time-consuming and rewarding parts of evidence analysis. A single audio recorder can capture hours of ambient sound, and reviewing it properly requires focused attention.

Listen carefully and completely. The first rule of audio review is to listen to the entire recording. Do not skip ahead to the moments that seem interesting. Context matters. A sound that seems mysterious in isolation may have an obvious explanation when heard in context. A voice-like sound that appears at the same time as a door closing in the background tells a different story than the same sound appearing in complete silence.

Multiple listen-throughs. One pass through an audio file is rarely enough. Plan to listen to each recording at least twice. The first pass gives you an overview of the recording's content. The second pass allows you to focus on specific sections that seemed unusual. If you identify a potential anomaly, listen to it several more times, each time focusing on a different aspect: the sound itself, the background noise, the timing relative to other events.

Use headphones. Headphones are essential for audio review. They isolate the recording from ambient noise in your review environment and allow you to hear details that speakers would mask. Use closed-back headphones for the best isolation. Listen at a comfortable volume — loud enough to hear details, but not so loud that you fatigue your ears or miss subtle sounds.

Document timestamps. Every observation during audio review should be recorded with a timestamp. Note the exact time code on the recording when you hear something unusual. This allows you to return to that moment quickly, to compare it with other recordings from the same time, and to correlate it with notes and environmental data. Use a consistent format: "File 2026-07-06_Hallway_Recorder1.wav, 00:14:32 — three tapping sounds."

Preserve original recordings. Never edit, enhance, or alter the original audio file. Make a copy for review and keep the original untouched. If you clip a section for closer analysis, label the clip clearly and note that it is a copy. The original file is your primary evidence. The copy is your working file. This distinction protects the integrity of your evidence.

Identify environmental sounds. Most sounds captured during an investigation have ordinary sources. Learn to recognize common environmental sounds: HVAC cycling, plumbing, settling wood, footsteps on different surfaces, doors closing, wind, rain, animals, distant traffic, aircraft, and voices from outside the investigation area. Building a mental library of these sounds will help you identify them quickly during review. When you hear a sound you cannot immediately identify, list the possible natural sources before considering paranormal explanations.

EVP requires restraint. Detailed EVP methodology — including classification systems, blind listening protocols, and advanced contamination controls — is covered later in the ITC and EVP track. This lesson teaches the foundational skill of listening carefully, conducting a basic session responsibly, and documenting what you hear without jumping to conclusions. If you capture a voice-like sound during your review, document it as an audio anomaly. Do not label it as a spirit voice or EVP until stronger review methods have been applied.

Basic EVP Session Procedure

An EVP session is a structured audio recording period in which investigators ask questions, allow quiet space for possible responses, and later review the recording for voice-like anomalies. In Ghostology 101, the goal is not to teach students to prove communication. The goal is to teach students how to run a clean beginner session that protects the audio record from contamination. A useful EVP session is quiet, documented, controlled, and reviewed carefully. A poor EVP session is noisy, emotionally charged, undocumented, and interpreted too quickly.

Begin with permission and purpose. Do not conduct EVP work in a location unless you have permission to investigate and permission to record. If the location is a residence or business, make sure everyone present understands that audio is being captured. Explain the purpose of the session in plain language: you are recording the environment, asking structured questions, and reviewing the file later for unusual audio. Do not promise contact. Do not tell clients that a recording session will prove who or what is present.

Choose the recording area carefully. Select a room or area where background noise can be understood and documented. Avoid rooms with loud appliances, running water, active televisions, nearby conversations, open windows, heavy traffic noise, or strong HVAC airflow if a quieter option is available. If a noisy area must be used because it connects to the claim, document the noise sources before the session begins. A room does not need to be perfectly silent, but the investigator needs to know what ordinary sounds are present.

Establish an audio baseline. Before asking any questions, record at least one to two minutes of normal room tone. During this baseline, no one should ask questions or whisper. Let the recorder capture the room as it is: HVAC hum, distant traffic, floor creaks, appliance cycles, outdoor sounds, and the natural noise floor of the device. This baseline becomes the comparison point during review. If a later sound resembles the baseline, it may be ordinary room noise rather than an anomaly.

Identify everyone present. At the beginning of the recording, state the date, time, location, room, recorder position, and names of everyone present. If multiple recorders are used, identify each recorder by placement: "Recorder one on the dining room table," "Recorder two near the hallway doorway," and so on. This spoken slate makes the file understandable later. It also helps reviewers know which people were present and where the equipment was placed.

Control team noise. During the session, no whispering should be allowed. Whispering is one of the most common causes of false EVP claims because it sounds mysterious during playback. If someone needs to speak, they should use a normal voice and identify themselves. If someone coughs, shifts in a chair, touches the recorder, bumps a table, steps on a squeaky board, or hears an outside noise, they should call it out clearly: "That was me moving," "Car passing outside," "HVAC just turned on," or "Footstep was Todd near the doorway." These callouts protect the recording.

Use short, respectful questions. Questions should be calm, simple, and spaced apart. Ask one question at a time, then leave silence for ten to twenty seconds before asking another. Avoid rapid-fire questions, leading statements, dramatic challenges, insults, taunts, threats, and fear-based language. A beginner session might ask: "Is there anyone here who would like to communicate?" "Can you tell us your name?" "Do you have a connection to this location?" "Is there something you want us to understand?" The wording should remain respectful even if the claim sounds frightening.

Do not provoke. Provocation is not investigation. Shouting, challenging, insulting, demanding a response, or using religious or demonic language to create a reaction can frighten clients, contaminate the emotional tone of the case, and produce poor evidence. Ghostology 101 should train students to be calm and respectful. If a session becomes emotionally charged, stop and reset. The purpose is documentation, not performance.

Keep sessions short. A beginner EVP session should usually last five to ten minutes. Longer sessions can be useful, but they create more review burden and increase the chance of fatigue, whispering, and undocumented movement. It is better to conduct several short, well-documented sessions than one long, messy recording. Between sessions, log what changed: who entered or left, whether HVAC changed, whether a door opened, whether a nearby appliance started, or whether outside noise increased.

Use more than one recorder when possible. Two recorders in different positions can help determine whether a sound was local to one area or audible across the room. If a voice-like sound appears strongly on one recorder but not another nearby recorder, that does not prove paranormal origin. It tells the reviewer to examine distance, direction, device sensitivity, obstruction, handling noise, and local sound sources. Multiple recorders create context, not certainty.

Mark notable events in real time. Keep a written log during the session. Record the start time, end time, questions asked, environmental changes, noises, movement, and anything witnesses report feeling or hearing. If someone hears a knock at 9:14 PM, write it down. If a dog barks outside, write it down. If a furnace starts, write it down. A voice-like sound during review is much more useful when it can be compared to a session log.

End the session clearly. At the end, state that the session is ending, give the time, and thank anyone present in a respectful way. This closing is not about belief. It is about clean documentation. It marks the boundary of the session so reviewers know when the structured recording period ended. After the session, stop the recorder and make sure the file saved correctly.

Preserve the original file. Copy the recording to the case folder as soon as possible and keep the original file untouched. Do not rename it in a way that removes device timestamps unless the original name is preserved somewhere in the log. Create working copies for review. If the file is clipped, amplified, filtered, or converted, document every change. A short clip posted online without the original file, session notes, and context is weak evidence even if it sounds impressive.

Review without leading the listener. If a section sounds like speech, do not tell another reviewer what you think it says. Provide the time range and ask what, if anything, they hear. If reviewers independently hear similar words without prompting, the clip may be worth further review. If reviewers hear different phrases, that suggests ambiguity or auditory pareidolia. Agreement can support intelligibility, but it still does not prove the source.

Classify cautiously. In Ghostology 101, the strongest beginner label for a voice-like sound is usually "unexplained audio anomaly pending further review." That wording keeps the door open without pretending certainty. Avoid labeling a sound as a spirit voice, ghost, demon, attachment, or direct message. The advanced ITC and EVP track can later teach classification systems, blind review, control questions, session design, and formal presentation standards. Here, the beginner standard is simple: record cleanly, document thoroughly, review carefully, and speak modestly.

Common EVP session mistakes. Beginners often whisper during silence, ask leading questions, talk over possible responses, forget to log movement, record beside noisy appliances, fail to preserve originals, over-filter audio, post clips before review, or tell listeners what words to hear. Each mistake weakens the recording. The best EVP session is not the most dramatic one. It is the one another investigator can reconstruct from the file, notes, timestamps, room conditions, and review process.

A basic EVP session should therefore follow this sequence: secure permission, choose and document the room, record baseline audio, identify everyone present, ask short respectful questions with silence between them, call out all ordinary noises, keep written notes, end the session clearly, preserve the original file, review with restraint, and classify only as far as the evidence allows. That sequence gives beginners a responsible starting point while leaving advanced interpretation for the proper specialty course.

Audio Review Contamination and Forensic Limits

Audio is powerful because it can preserve sounds that people did not notice in the moment. Audio is also dangerous because it is easy to mishear, over-process, or detach from context. A beginner should treat every voice-like sound as a question, not an answer. The review process should ask where the sound came from, whether it appears on other recorders, whether the team was speaking nearby, whether radio or phone audio could have been present, whether the recorder was handled, and whether the file was processed in a way that changed perception.

Contamination should be assumed until ruled out. Common audio contamination includes investigator whispering, clothing movement, recorder handling, tripod vibration, footsteps, HVAC changes, plumbing, wind, rain, distant traffic, neighbors, animals, phone notifications, radio bleed, television sound, and voices carrying through walls, windows, vents, or stairwells. In residential cases, family members, pets, appliances, and outside neighborhood activity can easily create sounds that seem unusual when heard later in isolation.

Control audio matters. If multiple recorders were placed in different rooms, compare them. A sound captured equally on several recorders may be loud environmental sound rather than a local anomaly. A sound captured only by a recorder beside a doorway may relate to movement near that doorway. A voice-like sound captured by one recorder but not by another nearby recorder requires careful documentation, but it still does not prove origin. It may reveal direction, distance, sensitivity differences, device settings, or obstruction, not paranormal activity.

Never lead listeners before review. If you tell a reviewer, "Listen for a woman saying get out," you have already shaped their perception. A better method is to provide the clip with no suggested phrase and ask the reviewer to write what they hear, where they hear it, and how confident they are. If reviewers independently hear similar content without prompting, that is more meaningful than a group agreeing after being told what words to expect. Even then, agreement supports intelligibility, not origin.

Enhancement must be logged. If a copy is amplified, filtered, noise-reduced, equalized, slowed, normalized, or clipped, the reviewer should log the exact action. Write the software used, the settings, the file name of the working copy, and the reason for the change. Always compare the processed version to the raw original. If a word only appears after aggressive processing, the responsible conclusion is not "the filter revealed a voice." The responsible conclusion is that processing created or emphasized a pattern requiring caution.

For Ghostology 101, the beginner standard is simple: preserve the original, review the complete recording, document timestamps, compare sources, avoid leading labels, and use restrained language. Call it an audio anomaly if it remains unexplained after initial review. Save stronger EVP claims for the advanced ITC and EVP methods where blind review, control recording, contamination mapping, and formal classification can be taught properly.

Reviewing Photographs — Seeing What Is Actually There

Photographs are among the most commonly collected types of evidence, and they are also among the most commonly misinterpreted. A camera captures light, not spirits. Every anomaly in a photograph should be examined against a checklist of ordinary causes before any paranormal interpretation is considered.

Lighting. The single most important factor in photographic review is understanding the lighting conditions when the photo was taken. Note the position of all light sources: flash, ambient room lights, windows, candles, and any equipment lights. Light can create reflections, lens flares, shadows, and color casts that look unusual. A bright spot that appears to float may simply be light reflecting off a surface at an angle. A dark shape may be a shadow cast by an object outside the frame.

Reflections. Reflections are one of the most common sources of false positives in paranormal photography. Glass, polished surfaces, water, eyeglasses, camera screens, and even dust particles can create reflections that appear as figures, faces, or lights. When you see an anomaly, ask: Is there a reflective surface in the frame? Could the anomaly be a reflection of something behind or beside the photographer? Compare the anomaly to known objects in the environment.

Motion blur. A slow shutter speed combined with movement creates motion blur. A person walking through a frame, a camera being moved, or an object falling can all appear as streaks, smears, or translucent shapes in a photograph. Motion blur is especially common in low-light conditions where the camera uses a longer exposure. If an anomaly has a streaked or directional appearance, motion blur should be your first consideration.

Dust. Dust particles near the lens are the most common cause of orbs in flash photography. When the flash fires, it illuminates dust particles that are invisible to the naked eye. These appear as bright, circular shapes in the photograph. Dust orbs typically have a bright center, a soft edge, and appear in clusters. They are often more visible in the center of the frame where the flash is strongest. If you see orbs in a photograph taken with flash, dust is the most likely explanation.

Pollen, dander, hair, and household particles. Dust is not the only material that can create orb-like or streak-like anomalies. Pollen, pet dander, human hair, lint, insulation fibers, ash, drywall dust, carpet fibers, and other household particles can all pass close to a lens and catch light. These materials are especially important in homes, basements, attics, barns, garages, older buildings, and outdoor locations during spring and summer. A particle close to the lens may appear large, bright, soft-edged, translucent, or oddly shaped because it is out of focus and strongly illuminated. The camera is not showing the true size of the particle. It is showing how that particle interacted with light, focus, distance, and the lens.

Insects. Insects near the lens can create anomalies that look very different from dust. A moth, fly, or gnat caught in the flash can appear as a streak, a blur, or an irregular shape. Insects are more common outdoors and in warm weather, but they can appear indoors as well. If an anomaly has an irregular shape, appears to have legs or wings, or appears in only one frame of a sequence, consider insects as a possible cause.

Camera settings. Understanding your camera's settings is essential for accurate photo review. ISO, shutter speed, aperture, white balance, and focus mode all affect how the camera captures an image. A high ISO setting can create noise that looks like static or particles. A slow shutter speed can create motion blur. An incorrect white balance can create color casts that look unusual. Before interpreting any anomaly, check the camera settings for that photograph and consider how they might have affected the image.

Image sequence. A single photograph is rarely enough to draw conclusions from. Compare the image to other photographs taken at the same location under the same conditions. An anomaly that appears in only one frame of a sequence is more likely to be a transient artifact — dust, an insect, a reflection — than evidence of paranormal activity. An anomaly that appears consistently across multiple frames deserves more attention, but still requires careful evaluation of natural causes.

Visual Review — Metadata, Artifacts, and Context

Photo and video review should begin before anyone zooms in on the strange-looking area. Start with context. What device captured the image? Was it a phone, DSLR, action camera, security camera, trail camera, webcam, SLS tablet, infrared camera, night-vision camera, or still frame exported from video? Each device has its own limitations. Phone cameras apply automatic processing. Security cameras compress heavily. Night-vision footage can exaggerate dust and insects. Wide-angle lenses distort edges. Infrared illumination can bounce from nearby surfaces. A visual anomaly cannot be judged fairly without knowing the device that created it.

Metadata is part of the evidence. When available, metadata may include date, time, device model, exposure, ISO, shutter speed, focal length, flash status, image dimensions, GPS information, and software history. Metadata is not perfect and can be missing or altered, but it is still useful. A high ISO setting may explain grain. A slow shutter may explain blur. Flash status may explain orbs. Software history may show that a file was exported, compressed, or edited. If metadata is absent, document that absence instead of pretending the context is complete.

Compression can create false structure. Many images and videos are compressed to reduce file size. Compression can create blocks, smears, edge halos, false texture, and color banding. When a viewer zooms far into a compressed image, those artifacts can begin to look like faces, writing, figures, eyes, or symbols. Social-media uploads make this worse because platforms often recompress files. The original file from the device is therefore much stronger than a screenshot, text-message image, or social-media copy.

Night footage needs special caution. Infrared cameras, low-light sensors, and automatic exposure systems can turn ordinary movement into dramatic-looking footage. Dust, pollen, insects, moisture, breath vapor, spiderwebs, reflective tape, shiny surfaces, and moving shadows can all appear strange under infrared illumination. A bug near the lens may look like a rod. A spiderweb close to the camera may look like a moving mist. A focus hunt may make a shape appear to materialize. These are not failures of the investigator; they are normal properties of cameras working in difficult conditions.

Use comparison frames. For any visual claim, collect the frame before, the frame of interest, and the frame after. For a photograph, compare nearby images in the sequence. For video, examine the seconds before and after the event. Does the light source change? Does the camera shift? Does a team member move nearby? Does the object appear gradually, suddenly, or only during a compression change? Comparison frames often explain what a single dramatic still image cannot.

Do not crop away the explanation. Cropping can help show a detail, but the full frame must remain available. A cropped image may remove the window that caused the reflection, the flashlight beam that caused the shadow, the team member at the edge of frame, or the object that created the blur. If a report includes a crop, it should also include the full original image or a clear reference to where the full original is preserved.

Spiderwebs, Orbs, and Fixed-Camera False Positives

Trail cameras, security cameras, GoPros, and fixed cameras. Fixed cameras deserve special caution because they often sit in one place for hours, days, or weeks. Trail cameras, security cameras, GoPros, action cameras, doorbell cameras, and static investigation cameras may capture the same patch of air repeatedly. Over time, spiderwebs, dust, pollen, dander, rain droplets, condensation, insects, leaves, grass, straps, cables, and reflections can move into the lens area. A camera that looked clear at setup may not be clear later. A spider may build a web across the field of view after the team leaves. A thin strand can drift in air currents and look like a white streak, a moving line, a reaching shape, or even something like legs moving across the frame. Under infrared light, those strands can glow brightly and appear much more solid than they really are.

Why fixed cameras fool people. A handheld camera is usually pointed at something for a short period of time. A fixed camera watches a scene continuously, which means small ordinary changes become part of the footage: a strand moves, a bug lands, dust drifts, condensation forms, pollen collects, wind shifts, a curtain moves, or a plant outside casts a changing shadow. Because nobody is standing behind the camera when the event occurs, beginners may treat the footage as if it came from a neutral witness. The camera is neutral only in the sense that it records what reaches the sensor. It does not understand distance, cause, intent, or meaning. A tiny object close to the lens can dominate the frame while a larger object across the room appears smaller and dimmer.

Trail cameras. Trail cameras are designed to detect movement and capture wildlife, not to interpret paranormal claims. Outdoors, they are surrounded by insects, leaves, rain, pollen, seed fluff, snow, fog, branches, grasses, spiderwebs, and animals. Indoors, they can still be affected by dust, pets, loose fabric, reflective objects, and infrared bounce. A trail camera may trigger because something passed close to the sensor, even if the visible image does not clearly show the source. That missing source can make the footage feel mysterious. The correct response is not to assume an invisible entity triggered the device. The correct response is to document the trigger, inspect the environment, compare nearby frames, and list likely ordinary causes.

Security cameras and doorbell cameras. Security systems often use wide-angle lenses, low resolution, heavy compression, automatic exposure, night vision, motion detection, and cloud processing. These systems are built for monitoring, not forensic certainty. A person walking outside, a vehicle headlight, rain on the lens, a porch light, insects near the IR emitter, or spiderwebs across the housing can create dramatic visual artifacts. Doorbell cameras are especially vulnerable because they sit outdoors near porch ceilings, siding, plants, lights, and insects. Web strands across a doorbell camera can look like long legs, bright rods, or shapes moving with purpose when they are simply close to the lens and strongly illuminated.

GoPros and action cameras. Action cameras have wide-angle lenses and small sensors. They are useful for documenting an investigation, but their image geometry can distort edges, stretch shapes, exaggerate motion, and make objects near the lens appear unusual. They may also be mounted on tripods, shelves, straps, chest harnesses, or improvised surfaces that vibrate or shift. A strap, loose cable, hair, sleeve, or tripod shadow can drift into frame and look strange under low light. When reviewing action-camera footage, check the mount, angle, housing, lens cover, and anything attached to or hanging near the camera.

Spiderwebs can look active. Web strands are one of the most common-sense explanations that people forget because the footage can look genuinely strange. A single strand near the lens may swing, twist, vibrate, or move in and out of focus. Multiple strands can resemble fingers, legs, rods, smoke, mist, writing, or a shape moving with intention. If the strand is close to the lens, the camera may blur it into a large translucent form. If infrared illumination hits it, it may flare and seem to brighten. If a spider or insect crosses the strand, the movement can look like something crawling across the camera or reaching into the scene. Before calling a moving line, streak, mist, or leg-like shape paranormal, physically inspect the camera housing, lens cover, nearby corners, branches, eaves, railings, tripods, and mounting points for webbing.

Look for attachment points. Webbing often has a point of attachment even when the strand itself is hard to see. A bright line may always pivot from the same corner. A mist-like strand may stretch from the top edge of frame. A leg-like movement may repeatedly begin near the same branch, ceiling corner, porch eave, rafter, tripod leg, or camera housing. If the anomaly moves like it is hinged, tethered, swaying, or returning to the same resting position, webbing, hair, fiber, fishing line, string, plant material, or a loose cable should be considered before any paranormal explanation.

Close-lens material changes scale. One reason these artifacts fool people is that cameras do not show distance intuitively when the object is very close to the lens. A tiny strand can appear huge. A dust particle can look like a glowing sphere. A gnat can look like a rod. A hair can look like a moving shape. Moisture droplets can look like lights or faces. The image is not showing the object's real-world size. It is showing an out-of-focus close object interacting with light. This is especially true when flash, infrared illumination, or a bright side light catches the material.

Orbs need ordinary explanations first. Orbs are often caused by particles close to the lens rather than objects in the room. Dust, pollen, dander, moisture droplets, insects, and tiny fibers can all reflect flash or infrared light. The closer the particle is to the lens, the larger and softer it may appear. This is why an orb can look big enough to be across the room even though the source may be a tiny particle only inches from the camera. Orbs that drift with airflow, appear in clusters, show up only when flash or IR is active, or appear frequently in dusty rooms should be treated as environmental particulate unless stronger evidence says otherwise.

Orb behavior can be documented. A responsible reviewer does not need to argue with every orb. Instead, document the conditions. Was the photo taken with flash? Was the camera using infrared? Was the room dusty? Were there pets, carpet, bedding, old furniture, insulation, pollen, smoke, fireplace ash, or open windows? Did multiple orbs appear at once? Did the orb appear soft-edged, translucent, or circular? Did it appear only in one frame? Did it follow airflow? Did nearby images show similar particles? These details help students learn that most orb claims are not mysteries. They are image artifacts created by ordinary particulate in ordinary air.

Dust, pollen, and dander are location clues. In a home, dust and pet dander may be strongest around bedrooms, vents, ceiling fans, furniture, rugs, pet beds, basements, attics, and storage areas. In abandoned or historical buildings, dust may include plaster, wood particles, insulation fibers, rust, soot, bird debris, insect remains, or disturbed flooring material. Outdoors, pollen, seed fluff, mist, gnats, moths, and moisture can fill the camera field without being obvious to the people present. A good investigator treats these materials as environmental context, not as an inconvenience. They explain why a camera produced what it produced.

Setup and pickup checks matter. A team should inspect cameras twice: when placing them and when collecting them. At setup, document the lens condition, nearby lights, reflective surfaces, vents, windows, branches, webbing, loose materials, and possible moving objects. At pickup, inspect the same area again. A web may have formed during the investigation. Condensation may have appeared. A bug may be on the housing. A cable may have shifted. A strap may have entered the frame. The pickup check is often where the explanation is found, but many beginners skip it because the investigation feels over.

Use control images. Before leaving a camera alone, capture a control image or short control clip with the lights and IR mode exactly as they will be during recording. If possible, capture another control image at pickup before moving the camera. These controls show the lens, field of view, reflections, dust level, nearby surfaces, and mounting angle. They also help reviewers compare the claimed anomaly against the normal look of that camera in that location. A control frame is boring until it explains the exciting frame.

Do not overreact to movement. Movement feels persuasive because people instinctively associate movement with agency. A line that moves can feel like something reaching. A drifting orb can feel like something navigating. A shadow that shifts can feel like something passing through. But movement alone does not establish intent. Airflow moves dust. Heat moves air. Wind moves webs. Vibration moves tripods. Compression changes pixels. Automatic exposure changes brightness. A responsible investigator asks what physical forces could move the object before asking whether the movement is intelligent.

Use common-sense camera checks. When reviewing fixed-camera footage, ask practical questions before interpreting the image: Was the lens clean at setup and at pickup? Was the camera under a porch, tree, ceiling corner, basement beam, attic rafter, or doorway where webs form? Was the camera near pets, bedding, carpets, hay, insulation, open windows, pollen, furnace vents, or dusty shelves? Did the weather change? Was there humidity or condensation? Were insects active that night? Did the same anomaly appear only in infrared mode? Does it move like air is pushing it? Does it remain attached to one point? These questions may sound ordinary, but ordinary questions prevent extraordinary mistakes.
Reviewing Video — Watching Frame by Frame When Appropriate

Video review combines the challenges of audio and photographic review with the added complexity of motion and timing. A video recording captures a continuous sequence of events, and reviewing it properly requires attention to both the visual and audio tracks.

Synchronized review. If multiple cameras were used during the investigation, review them in synchronization. Compare the time codes of different cameras to see if an event captured by one camera was also captured by another. A shadow that appears on one camera but not on another camera covering the same area may be a camera artifact rather than a genuine anomaly. Synchronized review also helps identify when team members appear in each other's footage, preventing false positives.

Environmental movement. Most movement captured on video during an investigation has ordinary causes. Curtains moving from air currents, plants swaying from drafts, dust particles floating in the air, and shadows shifting as clouds pass outside are all common sources of apparent motion. Before interpreting any movement as anomalous, check for environmental causes. Is there an HVAC vent nearby? Is a window open? Is there a fan running? Is there traffic or pedestrian movement outside?

Shadows. Shadows are a frequent source of false positives in video review. A shadow that appears to move on its own may be caused by a light source changing position, a person or object moving outside the frame, or the camera's automatic exposure adjustment. When you see a shadow that seems unusual, trace the light source. Where is the light coming from? What object would cast that shadow? Is the shadow consistent with the known light sources in the environment?

Camera shake. Handheld cameras, cameras mounted on unstable surfaces, and cameras affected by wind or vibration can produce footage that appears to show movement. Camera shake can make stationary objects appear to move, create blur that looks like figures, and cause the frame to shift in ways that suggest activity. If you are reviewing footage from a camera that was not securely mounted, account for camera shake before interpreting any movement.

Compression artifacts. Digital video is compressed to reduce file size. Compression can create visual artifacts: blocky areas, color banding, ghosting around moving objects, and pixelation. These artifacts are not evidence of paranormal activity. They are the result of the compression algorithm discarding data to save space. High-motion scenes, low-light footage, and heavily compressed files are most likely to show compression artifacts. If an anomaly appears blocky, pixelated, or has sharp edges that do not match the surrounding image, compression is a likely cause.

Reviewing frame by frame. When you identify a potential anomaly in video footage, review it frame by frame. Most video editing software allows you to advance one frame at a time. Frame-by-frame review reveals details that are invisible at normal playback speed. A shape that appears to be a figure at normal speed may resolve into a shadow, a reflection, or a camera artifact when examined frame by frame. A sound that seems to be a voice may reveal itself as a mechanical noise when the visual context is examined. Frame-by-frame review is a powerful tool, but it should be used selectively. Reviewing entire recordings frame by frame is impractical. Reserve it for moments that seem genuinely unusual after an initial full-speed review.

Organization Matters — File Naming, Folders, and Backups

Evidence review cannot begin until the media is organized. A pile of files with names like IMG_0423.JPG and AUDIO001.WAV is not evidence. It is noise. Organization is not a separate task from review. It is the foundation that makes review possible.

File naming. Establish a file naming convention before the investigation and use it consistently. A good file name includes the date, location, device, subject, time, and investigator initials. For example: "2026-07-06_LivingRoom_NorthWall_EMF_Spike_22-14-03_TK.wav" tells you everything you need to know about that file. "IMG_0423.JPG" tells you nothing. A consistent naming convention allows you to find files quickly, to sort them chronologically, and to correlate them with other data sources.

Folders. Create a folder structure for each investigation. A recommended structure is: Investigation_Date_Location / Raw_Media / Audio / Photo / Video / Processed / Reports. The Raw_Media folder contains the original, unaltered files. The Processed folder contains copies that have been reviewed, clipped, or enhanced. The Reports folder contains your analysis documents. This structure keeps originals separate from working copies and makes it easy to find any file.

Timestamps. Ensure that all devices used during the investigation have synchronized clocks. A time difference of even a few minutes between devices can make correlation impossible. Before the investigation begins, set all cameras, recorders, and other devices to the same time. Note the reference time source (for example, time.gov or a GPS time signal). During review, timestamps are the key to correlating audio, video, photographs, and notes.

Backups. Media files should be backed up immediately after the investigation. Do not wait. Hard drives fail. Memory cards are lost. Files are accidentally deleted. Back up all original files to at least two separate locations: one local (external hard drive) and one off-site (cloud storage or a second physical location). A backup is not a backup if it is stored in the same building as the original. A fire, flood, or theft could destroy both.

Preserving originals. The original file is sacred. It is the primary evidence. Never edit, rename, or alter the original file in any way. If you need to clip a section, adjust brightness, or enhance audio, make a copy first and work with the copy. The original remains untouched as a reference point. If your enhancement creates something that is not in the original, the enhancement is misleading. The original is the truth.

Metadata. Digital files contain metadata: information about the file itself, including the date and time it was created, the device that created it, and the camera settings used. This metadata can be valuable during review. It can confirm when a file was created, what device was used, and what settings were applied. However, metadata can also be altered or stripped by file processing. Preserve the original metadata by keeping the original file untouched. If you need to export a copy for sharing, include the metadata or document it separately.

Chain of Custody for Media Files

Chain of custody sounds like a courtroom phrase, but the basic idea is simple: know where the file came from, who handled it, what was done to it, and where the original is stored. Paranormal investigators may not be law enforcement, but they still need evidence integrity. If a team cannot explain how a recording moved from the device to the case folder, who reviewed it, whether it was edited, and which version is original, the file becomes weak.

Ingest the files carefully. At the end of an investigation, files should be transferred from each device into the case folder using a consistent process. Do not scatter files across personal desktops, phone galleries, text messages, and random folders. Create a raw media folder and copy each device into the correct subfolder. If possible, leave the device files untouched until the copy is verified. Record who performed the transfer, when it happened, and which device the files came from.

Separate original, working, and presentation files. The original file is the untouched file copied from the capture device. The working file is a duplicate used for listening, viewing, clipping, or analysis. The presentation file is a version prepared for a report, classroom, client meeting, or archive. These should not be confused. A presentation clip may be shorter, labeled, watermarked, normalized, or compressed. It may help people understand the finding, but it is not the master record. The master record remains the original.

Log every derivative. If you create a clip from a longer recording, write down the source file, start time, end time, export name, and reason for the clip. If you brighten a photo, write down the software and adjustment. If you stabilize video, write it down. If you extract a still frame, write down the original video file and exact timestamp. Derivative files are allowed, but unlogged derivative files create confusion.

Protect client privacy. Chain of custody is also a privacy issue. Residential recordings may include family conversations, children, medical details, personal photographs, religious items, financial papers, or private emotional moments. Business recordings may include employees, customers, security procedures, inventory, or confidential information. Evidence review should happen inside the case team, not in public chats or social media groups. If a file must be shared for review, share the minimum necessary and document who received it.

Do not let excitement break the chain. Many evidence problems begin when someone finds a strange clip and immediately sends it to friends, posts it online, or exports several unlabeled versions. That may feel exciting in the moment, but it damages the investigation. The stronger habit is to pause, preserve, log, compare, and only then decide whether the file is worth sharing under the case's evidence-use permissions.

Comparing Media — Correlation versus Coincidence

One of the most powerful tools in evidence review is comparison. A single piece of data — a sound, an image, a temperature reading — is rarely conclusive. But when multiple data sources point to the same event at the same time, the evidence becomes stronger. This is correlation. Understanding the difference between correlation and coincidence is essential.

Compare audio to notes. After reviewing an audio recording, compare your findings to the investigation notes. Did anyone in the team note hearing the same sound at the same time? Was there an event in the notes that corresponds to the audio anomaly? A sound that was heard by multiple people and recorded on multiple devices is more significant than a sound that appears on only one recording and was not noted by anyone present.

Compare photographs to logs. When reviewing photographs, compare them to the photo log created during the investigation. The log should record what each photograph was intended to capture, the camera settings, and any observations about the scene at the time. A photograph that shows an anomaly that was not visible to the photographer at the time deserves attention. But it also requires careful evaluation: was the anomaly caused by a camera artifact, a reflection, or a change in lighting that was not visible to the naked eye?

Compare video to environmental conditions. Video footage should be compared to the environmental data collected during the investigation. Did the temperature change at the same time as a visual anomaly? Was there a spike in EMF? Was the barometric pressure changing? Correlating video anomalies with environmental data can help identify natural causes. A shadow that appears at the same time as a cloud passing overhead is explained. A shadow that appears when there is no change in external light sources is more interesting.

Compare witness statements. If witnesses reported specific events during the investigation, compare their statements to the media evidence. A witness who reported hearing a knock at 9:22 PM should be compared to the audio recording from that time. A witness who reported seeing a figure in a specific location should be compared to the video footage from that area. Corroboration between witness testimony and media evidence strengthens both. Contradiction between them requires further investigation.

Correlation versus coincidence. Correlation means that two or more pieces of data point to the same event at the same time. Coincidence means that two events happen at the same time without being causally related. The key question is: does the correlation make sense given the context? If an audio anomaly occurs at the same time as a temperature drop and a witness reports feeling cold, that is a meaningful correlation. If an audio anomaly occurs at the same time as a car passes outside, that is likely a coincidence. The more data points that align, the stronger the correlation. But correlation alone does not prove causation. It is a starting point for further analysis, not a conclusion.

Review Roles and Independent Checks

A serious review process works better when roles are defined. Beginners often imagine evidence review as one person sitting alone with headphones and a strong opinion. That is not enough. A stronger review uses multiple people, clear responsibilities, and independent checks. The goal is not to make the process complicated. The goal is to reduce bias and prevent one excited interpretation from becoming the team's official conclusion too quickly.

The primary reviewer performs the first complete pass through assigned files. This person documents timestamps, obvious explanations, questionable moments, and files that need a second look. The primary reviewer should not be trying to prove a claim. Their job is to identify observations and organize them for further review.

The secondary reviewer checks the flagged items without being told what conclusion to reach. For audio, the secondary reviewer should ideally listen without a suggested phrase. For visual media, they should view the full frame or full clip before being shown a crop or label. Their notes should be written independently. If the secondary reviewer sees or hears something different, that disagreement is valuable, not embarrassing. It tells the team that perception is playing a role.

The case lead compares reviewer notes against the field log, environmental log, equipment log, and witness statements. This person decides whether the file is explained, likely explained, unresolved, unusable, or needs advanced review. The case lead should also make sure evidence language stays restrained. A case lead who allows "demon voice," "apparition," or "proof" into the file before analysis is finished is weakening the work.

The skeptic role is not the person who mocks the case. It is the person assigned to ask what else could explain the file. Could it be reflection, compression, investigator movement, animal sound, outside voices, plumbing, HVAC, device noise, camera processing, or a timing error? A respectful skeptic protects the team from premature certainty. In a healthy investigation culture, this role is appreciated because it makes strong findings stronger and weak findings easier to release.

Disagreement should be documented. If one reviewer hears "help me" and another hears only a mechanical squeak, write both down. If one reviewer sees a figure and another sees shadow texture, write both down. Review disagreement does not ruin evidence; it clarifies the limits of the evidence. A final report can say that reviewers disagreed on intelligibility or visual interpretation. That is honest and professional.

Avoiding Confirmation Bias — The Investigator's Greatest Challenge

Confirmation bias is the tendency to notice, remember, and interpret information in a way that confirms what you already believe. It is not a character flaw. It is how the human brain works. Every investigator — beginner or experienced — must actively guard against it.

Expectation. If you enter a review session expecting to find evidence of paranormal activity, you will find it. Your brain will interpret ambiguous sounds as voices, random patterns as faces, and ordinary shadows as figures. If you enter a review session expecting to find nothing, you may dismiss genuine anomalies without giving them proper attention. The best approach is to enter review with no expectation at all. You are not looking for evidence of anything. You are looking at what is actually there.

Selective review. One of the most common forms of confirmation bias in evidence review is selective attention. Investigators focus on the moments that seem interesting and ignore the hours of uneventful footage. This creates a distorted picture. A single anomalous sound in four hours of recording is not the same as four hours of anomalous activity. Review the entire recording, not just the parts that seem exciting. Document the uneventful periods as well as the unusual ones. The absence of activity is also data.

Replay fatigue. When you listen to a section of audio or watch a section of video repeatedly, your perception changes. Sounds that were unclear on the first listen may seem clearer on the tenth. Shapes that were ambiguous on the first viewing may seem definite on the twentieth. This is not because the evidence has changed. It is because your brain has become familiar with the stimulus and is filling in details. Replay fatigue can make you hear words that are not there and see figures that are not present. If you find yourself listening to a section of audio over and over, trying to make out what it says, step away. Take a break. Come back later with fresh ears.

Hearing what we expect. Auditory pareidolia is the tendency to hear patterns in random noise. When you listen to audio that contains static, wind, or background noise, your brain tries to make sense of it. It may interpret random noise as speech, music, or other meaningful sounds. This is the same mechanism that makes you hear a melody in the hum of a fan or a voice in the sound of running water. During audio review, be aware of this tendency. If you think you hear a voice, ask: Is this clearly speech, or could it be my brain imposing a pattern on random noise? Have someone else listen without being told what to expect.

Seeing what we expect. Visual pareidolia is the tendency to see familiar patterns, especially faces, in random visual stimuli. A pattern of shadows and light can look like a face. A dust particle can look like a figure. A reflection can look like an apparition. During photo and video review, be aware of this tendency. If you think you see a face or a figure, ask: Is this clearly a human form, or could it be my brain imposing a pattern on random shapes? Compare the image to known objects in the environment. Look at the image from different angles. Have someone else review it without being told what to look for.

Responsible Interpretation — Observation First, Explanation Second, Conclusions Last

The most important principle in evidence review is the order of operations: observation first, explanation second, conclusions last. This sequence protects you from jumping to conclusions before you have all the information.

Observation first. Before you interpret anything, describe exactly what you observed. Use sensory language. "I heard three tapping sounds at 00:14:32" is an observation. "I saw a dark shape in the upper left corner of frame 7" is an observation. "The temperature reading dropped from 68 to 62 degrees over a period of 30 seconds" is an observation. Observations are the raw material of investigation. They must be recorded before they are interpreted.

Explanation second. After you have recorded your observations, list possible explanations. Start with the most ordinary explanations first. Could the sound be plumbing? Could the shape be a shadow? Could the temperature drop be caused by an HVAC cycle? List as many natural explanations as you can think of. Then, and only then, consider whether a paranormal explanation is warranted. The paranormal explanation should be the last one on your list, not the first.

Conclusions last. A conclusion is a judgment you reach after weighing the evidence. It should be based on the observations and explanations you have documented, not on your initial impression or your hopes. A conclusion can be: this has a natural explanation; this is inconclusive; this remains unexplained; or this warrants further investigation. A conclusion does not have to be dramatic. In fact, the most honest conclusions are often the most measured. "I cannot determine what caused this sound" is a valid conclusion. "This is definitely paranormal" is rarely justified by the evidence.

The discipline of patience. Responsible interpretation requires patience. It requires sitting with uncertainty and not forcing a conclusion before the evidence supports one. It requires being willing to say "I do not know" and to leave a case open rather than closing it prematurely. This discipline is difficult, especially when you are excited about a piece of evidence. But it is the discipline that separates credible investigators from those who produce dramatic but unreliable findings.

Practical Investigation Examples — Six Detailed Scenarios

The following scenarios demonstrate proper review methods. Each example shows how a disciplined investigator approaches a piece of evidence.

Scenario 1: The Unexplained Sound. During audio review, an investigator hears a low thud at 00:23:15 in a hallway recording. Instead of immediately labeling it as paranormal, she checks the investigation notes. At 00:23:15, a team member noted that he was walking from the kitchen to the living room, which is adjacent to the hallway. The sound corresponds to the team member's movement. The sound is explained. If the notes had shown no team activity at that time, she would have listed other possible explanations: settling, HVAC, an animal, or an object falling. Only after exhausting natural explanations would she consider it unexplained.

Scenario 2: The Blurred Figure. A photograph taken in a dimly lit basement shows a blurry, human-shaped form near the stairs. The investigator does not immediately conclude it is an apparition. He checks the camera settings: the shutter speed was 1/15 of a second, which is slow enough to create motion blur. He checks the photo log: the photographer noted that she was walking down the stairs when she took the photo. The blurry figure is the photographer's own arm, blurred by the slow shutter speed and her movement. The anomaly is explained.

Scenario 3: The Reflected Light. A video recording shows a bright, moving light in a room that appears to be dark. The investigator does not assume it is a spirit light. She checks the position of the camera and the layout of the room. The camera is pointed toward a window. Outside the window, a car is visible in the footage. The bright light is a reflection of the car's headlights on the window glass. The anomaly is explained.

Scenario 4: The Camera Movement. A stationary camera captures footage that shows the frame shifting slightly, as if the camera is being moved. The investigator checks the camera setup: it was mounted on a lightweight tripod on a wooden floor. He reviews footage from earlier in the night and sees that the same slight shift occurs whenever someone walks near the camera. The vibration from footsteps on the wooden floor is causing the tripod to shift. The anomaly is explained.

Scenario 5: The Insect Near the Lens. A photograph taken outdoors at night with flash shows a large, irregularly shaped anomaly. The investigator does not assume it is a paranormal entity. She examines the shape: it has what appears to be wings and a body. She checks the weather conditions: it was a warm summer night. She reviews other photos taken at the same time: several show similar irregular shapes. The anomaly is an insect — likely a moth — that flew past the lens when the flash fired. The anomaly is explained.

Scenario 6: The Unexplained Audio. An investigator reviews audio from a quiet room and hears a voice-like sound that does not correspond to any known team member's position. He checks the investigation notes: no one was in that room at the time. He checks the environmental log: the windows were closed, the HVAC was off, and there was no known radio interference. He has the recording reviewed independently by two other investigators who were not present during the investigation. Both confirm that the sound does not appear to be a natural or human-made noise. The sound remains unexplained. The investigator documents it as an audio anomaly requiring further analysis. He does not label it as EVP or a spirit voice. He simply records that the sound could not be explained after initial review and recommends further analysis using the methods taught in the ITC and EVP track.

Common Beginner Mistakes

The following mistakes are common among new investigators. Recognizing them will help you avoid them in your own review practice.

Reviewing only interesting files. Beginners often review only the files that seem promising and ignore the rest. This creates a biased sample. You cannot know what is significant until you have reviewed everything. Review all files, even the ones that seem boring. The most important evidence is sometimes found in the most unexpected places.

Editing originals. Editing or enhancing the original file destroys the primary evidence. Always work with copies. Preserve the original untouched. If your enhancement creates something that is not in the original, the enhancement is misleading, not revealing.

Sharing before analysis. Posting evidence online before it has been thoroughly analyzed is a common and damaging mistake. Once a file is shared, it cannot be unshared. Premature sharing can embarrass the investigator, mislead the public, and compromise the case. Analyze first. Share later, if at all.

Ignoring notes. Investigation notes are essential context for evidence review. Reviewing media without consulting the notes is like reading a book with half the pages missing. Always review the notes alongside the media. The notes tell you what was happening, who was where, and what conditions were present.

Reviewing alone. Reviewing evidence alone increases the risk of bias. A second reviewer brings a fresh perspective and may notice things you missed. A third reviewer provides an additional check. Whenever possible, have at least one other person review your evidence independently. If you cannot have a second reviewer, at least take breaks and return to the evidence with fresh eyes.

Over-enhancing media. Beginners often apply heavy enhancement to audio and images in an attempt to reveal hidden evidence. Excessive enhancement — extreme contrast, excessive noise reduction, heavy amplification — can create artifacts that look or sound like evidence. If you must enhance, do so minimally and always compare the enhanced version to the original. If the enhancement creates something that is not in the original, it is not evidence.

Common Misconceptions

The following misconceptions are widespread in paranormal investigation. Understanding why they are incorrect will help you avoid them.

"Every anomaly is paranormal." An anomaly is simply something that cannot be immediately explained. Most anomalies have ordinary causes that become apparent with careful investigation. An anomaly is not evidence of paranormal activity. It is a question that requires further investigation.

"Clearer always means better." Enhancing a photo or audio file to make it clearer does not necessarily make it more accurate. Enhancement can introduce artifacts, remove subtle details, and create a false impression of clarity. The original file is the most accurate representation of what was captured. Enhanced versions should be treated as analytical tools, not as improved evidence.

"One photograph proves a haunting." A single photograph, no matter how compelling, is not proof of a haunting. Photographs can be affected by countless variables: camera settings, lighting, reflections, dust, insects, compression, and processing. A single photograph is a data point, not a conclusion. Multiple photographs, taken under controlled conditions and reviewed in context, are more meaningful than any single image.

"Audio enhancement creates truth." Amplifying, filtering, or otherwise enhancing an audio recording does not reveal hidden truth. It reveals what the enhancement algorithm produces. Different enhancement settings can produce different results from the same source. An enhanced audio file should always be compared to the original. If the enhancement creates words that are not audible in the original, the enhancement is creating, not revealing.

"All static contains voices." The human brain is wired to find patterns in noise. When you listen to static, white noise, or background hiss, your brain will try to impose meaning on it. This is auditory pareidolia. Not all static contains voices. Most static is just static. The belief that all static contains hidden messages is a misconception that leads to false positives.

Student Activity — Document Observations Only

For this activity, you will practice the discipline of documenting observations without drawing paranormal conclusions.

Find a collection of ordinary photographs or audio recordings. You can use your own photos, images from online sources, or recordings you make yourself. The content does not matter. What matters is the process.

Review each file and document your observations using the following format:

File name: [name of the file]

Type: [photo or audio]

Date and time of capture: [if known]

Description of content: [describe what is in the file using sensory language only]

Notable features: [list anything that seems unusual or worth noting]

Possible natural explanations: [list at least three natural explanations for any notable features]

Questions for further review: [what would you need to check to determine the cause?]

Complete this exercise for at least five files. The goal is to practice describing what is actually there without jumping to conclusions. No paranormal conclusions are permitted in this exercise. If you find yourself wanting to say "this might be paranormal," stop and list three more natural explanations instead.

Reflection Questions

The following questions are designed to help you think more deeply about the concepts in this lesson. Use these as optional reflection or discussion prompts.

1. Why is evidence review often more important than evidence collection? What would be lost if an investigator collected media but never reviewed it carefully?

2. Think about a time when you saw or heard something that seemed unusual at first but turned out to have an ordinary explanation. How did your initial interpretation change as you gathered more information? How might this experience apply to evidence review?

3. Why is it important to preserve original files and work only with copies during review? What problems could arise if the original file was altered?

4. How does confirmation bias affect evidence review? What specific steps can you take to reduce its influence on your own review practice?

5. What is the difference between correlation and coincidence? Why is this distinction important when comparing different types of evidence?

6. Why should paranormal explanations be the last consideration rather than the first? What does this order of operations protect?

7. How would you respond if a fellow investigator presented a piece of evidence that you believed had a natural explanation, but they were convinced it was paranormal? How would you discuss the difference of opinion respectfully?

8. What is the value of documenting that nothing unusual was found during a review session? How does a negative result contribute to the investigation?

Key Takeaways

This lesson has introduced the foundational principles of reviewing audio, photo, and video evidence. The key takeaways are:

Evidence review is often more important than evidence collection. The real work begins after the investigation ends.

Review audio carefully and completely. Use headphones. Listen multiple times. Document timestamps. Preserve original files. Identify environmental sounds before considering paranormal explanations.

Conduct beginner EVP sessions with structure and restraint. Secure permission, record a baseline, identify everyone present, ask short respectful questions, leave silence, call out ordinary noises, preserve the original file, and describe voice-like material as an audio anomaly until deeper review supports stronger language.

Review photographs systematically. Check for lighting, reflections, motion blur, dust, insects, and camera settings. Compare images to others taken at the same location. A single photograph is rarely conclusive.

Review video with attention to environmental movement, shadows, camera shake, and compression artifacts. Use frame-by-frame review selectively for potential anomalies. Synchronize multiple camera feeds when possible.

Organization is essential. Use consistent file naming, folder structures, synchronized timestamps, and backups. Preserve original files untouched. Document metadata.

Compare media across sources. Correlate audio with notes, photographs with logs, video with environmental data, and all media with witness statements. Distinguish correlation from coincidence.

Guard against confirmation bias. Review all files, not just the interesting ones. Be aware of replay fatigue and pareidolia. Have others review independently.

Follow the order: observation first, explanation second, conclusions last. Start with the most ordinary explanations. Be willing to say "I do not know."

Good investigators review carefully before drawing conclusions. The discipline of careful review is what transforms recordings and photographs into useful investigative data.

Repository Connections

The concepts in this lesson connect to several resources within The Paranormal Initiative - Applied Paranormal Research and Studies. Use these links to deepen your understanding of evidence review.

Evidence Compendium: For comprehensive standards on evidence classification, review protocols, and documentation, see the Evidence Compendium.

Equipment Manual: For guidance on how different recording devices capture audio, photo, and video, and how device settings affect the resulting files, see the Equipment Manual.

Investigation Compendium: For standards on investigation documentation, case file structure, and evidence management, see the Investigation Compendium.

Terminology Reference: For definitions of terms used in this lesson, including anomaly, artifact, pareidolia, correlation, and contamination, see the Terminology Reference.

Forensic Analysis Compendium: For advanced guidance on media analysis techniques, including enhancement protocols and artifact identification, see the Forensic Analysis Compendium.

Where You'll Learn More

This lesson has introduced the foundational principles of media review. The skills introduced here will be developed further in several advanced tracks.

Evidence and Analysis Track. The Evidence and Analysis track teaches advanced evidence evaluation, including audio evidence categories, video evidence categories, photo evidence categories, corroboration and contradiction, chain of custody, and writing findings. These courses build directly on the review foundations established in this lesson.

ITC and EVP Track. The ITC and EVP track provides comprehensive instruction on EVP methodology, including recording methods, session structure, blind listening workflows, contamination control, and responsible presentation. This track is the natural next step for students who want to develop advanced audio analysis skills.

Equipment Studies Track. The Equipment Studies track teaches how each recording device works, what settings affect capture quality, and how to use equipment to produce the best possible source material for review. Understanding your equipment is essential for effective review.

Applied Paranormal Research and Studies. The professional curriculum includes advanced instruction on photo and video anomaly analysis, data correlation across logs and media, and professional reporting standards. These courses assume the foundational review skills you are building now and extend them into professional practice.

Each of these tracks will deepen your ability to review, analyze, and interpret investigation media. The foundation you are building now will support everything you learn in the future.

Next Lesson Connection

Now that you understand how to review audio, photo, and video evidence, the next lesson teaches you how to evaluate ordinary explanations before considering extraordinary ones. Lesson 17: Debunking Basics and Natural Explanations will show you that debunking is not dismissive skepticism. It is a core investigative practice that strengthens the credibility of any finding that remains unexplained. After learning how to review media, you must learn how to test what you find against the most likely natural causes. That is the next step in becoming a thorough and honest investigator.

Field Application

In the field, intro to audio, photo, and video review becomes visible through small decisions. The investigator decides what questions to ask, what details to write down, what assumptions to avoid, and what language to use when speaking with others. A student who understands this lesson should be able to enter a location and behave differently because of it. The learning should change conduct, not simply add information. A photograph shows a bright orb near a doorway. A responsible reviewer asks whether flash was used, whether dust or insects were present, what the humidity was, how close the object was to the lens, whether similar orbs appear in nearby photos, and whether the camera settings support a natural explanation. The image may remain interesting, but it cannot be called evidence without context. The point of the example is not to give the student a script to memorize. It is to show how the concept works under real pressure. Fieldwork is rarely neat. People interrupt each other. Equipment fails. Weather changes. A witness remembers something after the interview is over. A teammate gets excited. A client asks for certainty. A responsible investigator uses the foundation from this lesson to stay oriented when the situation becomes messy. When teaching this section live, ask students to describe what they would do first, second, and third. If they jump straight to a paranormal explanation, bring them back to the process. What exactly was reported? Who reported it? When did it happen? What changed in the environment? What was documented? What can be checked? That sequence is the difference between curiosity and investigation.

Documentation Standard

Documentation is the way this lesson becomes reviewable. The student should not merely say that they understand the concept. They should be able to record it in a case file. Notes should include the claim, the setting, the people present, the relevant environmental conditions, the questions asked, the actions taken, and the limits of what was learned. If a later reviewer cannot reconstruct the reasoning, the documentation is incomplete. Review one audio clip, one photograph, and one short video. For each, write the original observation, possible false positives, missing metadata, and what additional information would be needed before assigning any confidence level. This optional practice can be discussed, demonstrated, or written privately. The student should focus on clear separation between observation and interpretation. The goal is to build the habit of writing like an investigator rather than narrating like a storyteller. A good entry should allow someone who was not present to understand what happened and how the student thought through it. The documentation should also include what was not known. Beginners often omit uncertainty because they think it makes them look unprepared. In reality, uncertainty is one of the most professional things an investigator can preserve. Write down what remains unknown, what still needs to be checked, and what would be required before a stronger conclusion could be reached.

Common Failure Points

The common failure is isolating media from context. A sound without a timestamp, a photo without camera settings, or a video without location notes loses much of its value. Media is strongest when it connects to field notes, environmental readings, witness accounts, and other recordings. This mistake is common because the paranormal field rewards certainty, confidence, and dramatic language. Social media rewards the strongest claim, not the most careful one. A classroom, however, must reward process. The student should learn to recognize when excitement is pushing them ahead of the evidence. Another common failure is treating the lesson as theory only. A student may agree with the principle in class but abandon it during a case because the situation feels unusual. The entire purpose of Ghostology 101 is to make the principle strong enough to survive the field. The lesson should therefore include examples, examples and optional practice prompts that invite the student to apply the idea rather than simply admire it. The instructor should also watch for language that hides assumptions. Words such as "definitely," "obviously," "evil," "spirit," "energy," "proof," and "debunked" can all be useful in some contexts, but they can also smuggle conclusions into the record. Students should be trained to replace conclusion-heavy language with descriptive language whenever the evidence is still being evaluated.

Lesson 15 Back to Ghostology 101 Lesson 17